He walks!
The single in-place step is the core of a walk, and there are techniques to make a character walk along a complex path after you have merely defined a single step, as we have done here, but for the purpose of our Quick Start this is enough.
Turn to the Rendering Buttons (F12) and set the Animation start and end to 1 and 40 respectively (Figure 67). This is because frame 41 is identical to frame 1, hence we only need to render frames from 1 to 40 to have the full cycle.
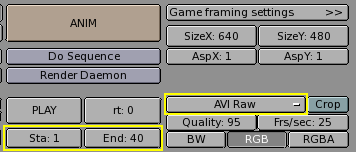
Now select AVI Raw as a file type (Figure 67). This is generally not the best choice as will be explained later on, but it is quick and it will work on any machine, so it suits our needs. You can also select AVI Jpeg, which will produce a more compact file, but using a lossy Jpeg compression.
Finally press ANIM. Remember that all the layers that you want must be shown! In our case 1 and 10.
 | Stopping a Rendering |
|---|---|
If you realize that you have made a mistake, like forgetting to set layer 10 to on, you can stop the rendering process with the ESC key. |
The scene is pretty simple, and Blender will probably render each of the 40 images in few seconds. Watch them as they appear.
| Stills |
|---|---|
Of course you can always render each of your animation frames as a still by selecting the frame and pressing the RENDER button instead. |
Once the rendering is over you will have a file named 0001_0040.avi in a render subdirectory of your current directory, that is the one containing your .blend file.
You can play it back directly within Blender by pressing the Play button beneath the ANIM button (Figure 67).
The animation will automatically cycle. To stop it press ESC.
This is just a very basic walk cycle. There is much more in Blender, just read on to discover!