Tutorials - Blender Game Engine
Making a Beautiful Sky
A complete skydome creation tutorial by
Dim
Prerequisites:
To complete this tutorial, you will need a good handle on texturing in Blender, the basics of
the GIMP, and some basic knowledge of Terragen. The software we will use is
Blender version 2.42a,
The GIMP version 2.2.13 and
Terragen version 0.9.43. Note that while
there is a free version, you may not use Terragen commercially without purchasing a license.
Note that you may use Photoshop in the place of the GIMP, but many of the keyboard shortcuts
and locations of different features will be different. Also, I recommend that you go through
my
stone texture tutorial before you begin if you are new to
texturing.
Preamble:
I am creating this tutorial about making sky domes largely to illustrate an alternative to the
sky box, mainly because of the difficulty involved in creating skyboxes, and their simplistic
geometry often leads to less than flattering effects. People often dislike sky domes because
they use more geometry, it’s harder to make good textures for them, and it’s very difficult to
make them seamless. Well, the amount of additional geometry is negligible, and this tutorial is
aimed at fixing the other two issues associated with sky domes, in order to make beautiful
skies. This tutorial is however not right for everyone and every situation, so if this isn’t
your thing or you want an alternative, please check out Social's
Seamless Skyboxes tutorial.
This tutorial is essentially split into four sections, and different software will be used in
each one, except the last.
- Terragen - how to use Terragen to actually generate the
pieces needed to make a sky
- The GIMP - using the GIMP to stitch all the pieces together into a
beautiful texture
- Blender - using Blender to apply the texture to your scene
- Extensions - how to make a sun for your sky, and other extensions
Now then, let’s begin.
Section I.
Generating Sky Pieces With Terragen
Beginning:
Ok, the first thing we’re going to do is fire up Terragen and make our panoramic sky texture.
I really recommend that you follow this part of the tutorial and learn how to make your own sky
textures, but if you are in a hurry, or have some other reason to not want to learn this part,
use some of the sky textures found here:
http://www.3delyvisions.com/skf1.htm and crop off the bottoms, then proceed to the
"
Polarization” heading in the GIMP section of this
tutorial. Keep in mind that if you use those images, you will not be able to have a dynamic,
moving sky.
First thing we’re going to do is make a sky the way we want. There’s a few things we’ll want to
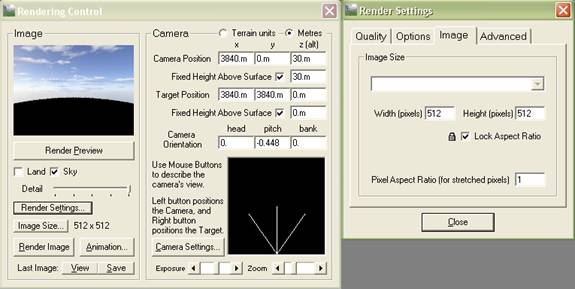
do first though. One is to render a preview of what our cloudscape looks like now. On the
“Render Control” dialogue, uncheck the “Land” box, so that when we render it, it’ll take less
time. Then click the “Render Preview” button and you’ll see what the sky looks like now. It’s
not bad. Now click the “Image Size” button and set both our height and width to 512. While
still in this dialogue, select the “Quality” tab, and increase the “Atmosphere” and “Cloud
Shading” values to what you like. Keep in mind that both of these values will slow your render
time down significantly, so use them only on the final renders of each cloudscape. So far,
your setting should look like this:
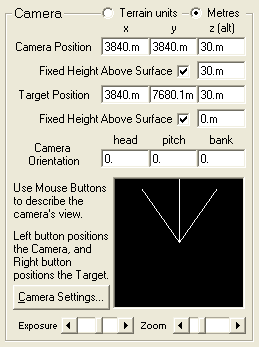
Before we render this, let’s put our camera in the best position so that we can rotate it and
get a panoramic view. Use these setting to get it to the place we want.
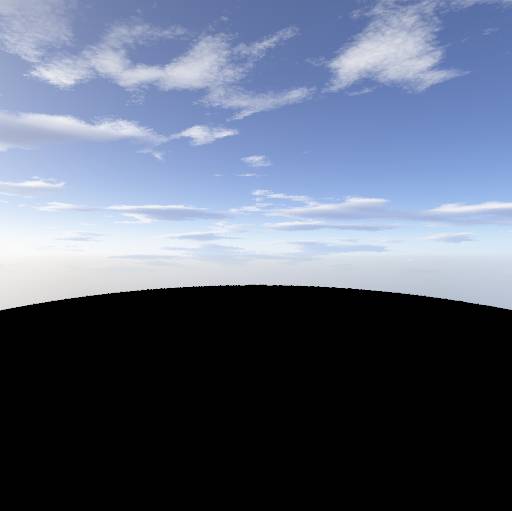
Now click “Render Image” And see how it looks!
Adjustment:
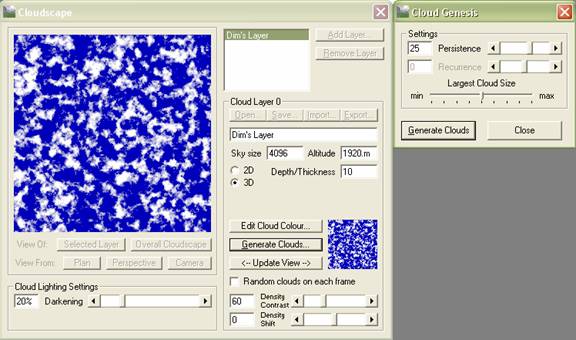
Now we should adjust the cloud settings, and colors to our liking and the mood we’re interested
in representing. Click the “Cloudscape” button on the left. During this part, mess around with
all the functions and render previews often to see how things work. There’s a few buttons in
particular we’ll use. The first one is the “3D” check box. Check that instead of the “2D” one.
Also, you’ll notice the “Depth/Thickness” field. Adjust that to around 10ish, or to your liking.
Also, I boost up the “Density/Contrast” slider to about 60. This slider gives “weight” to our
clouds; it makes them look like they may be carrying water. When you change this slider, it
generally darkens things, so I slide the “Darkening” slider down to about 20%. Also, we need to
click the “Generate Clouds” button and take a look at some of these options. “Persistence”
controls how many smaller clouds are generated around larger ones. “Recurrence” is currently
not implemented as of this writing. “Largest Cloud Size” is pretty self explanatory. Right now,
these settings are probably good, but tweak them to your liking. Once satisfied, press “Generate
Clouds”, and then render a preview and our clouds should look pretty nice. Ideally, when we
render this, we don’t want any clouds touching the top border of our render, since it’ll save us
some time later. This is pretty much unavoidable, but just try to minimize it. Here are the
settings I used:
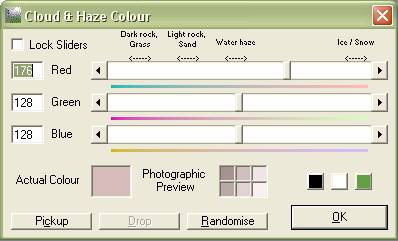
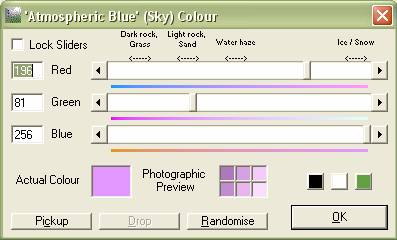
Ok, now that we have the general type and shape of our clouds, we can change the color however
we like, to make sunsets, icy grey skies, or Martian sunrises. Open up the “Atmosphere” dialogue
on the left. This will let us change the color and density of all of the atmospheric effects,
such as “Simple Haze”, “Atmospheric Blue”, and “Light Decay/Red”. There is a short description
of what each function does next to it. “Simple Haze” most importantly changes the cloud color
for us. “Atmospheric Blue” basically changes the color of the whole sky. “Light Decay/Red”
basically adds a colored filter over your entire scene. I was going for a reddish sunset so this
is what I entered in the “Simple Haze":
This will let my clouds fit into the scene better. And here are my “Atmospheric Blue” settings:
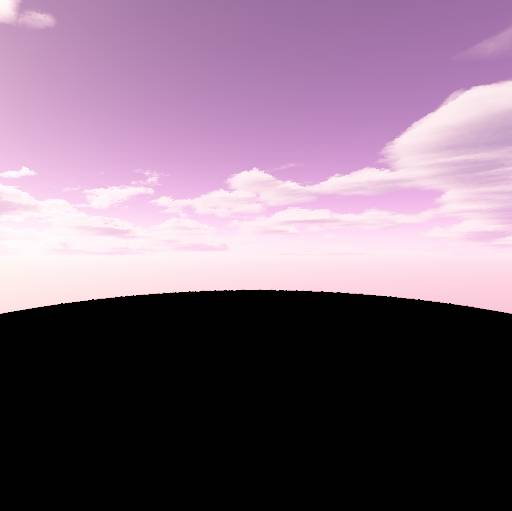
All told, the render looks something like this:
For this next part, you need to decide whether you will have a static sky (one that never moves),
or a more dynamic sky, that has the clouds move about. If it’s static, skip to the next section
(“
Capturing the Panorama”). In order to have a sky with
moving clouds, we’ll need to have the sun separate from the clouds, because it doesn’t make
sense that the sun would be moving at the same speed as the clouds. In order to accomplish this,
we’ll make the sun small enough that we can’t really see it, but have its effect on the
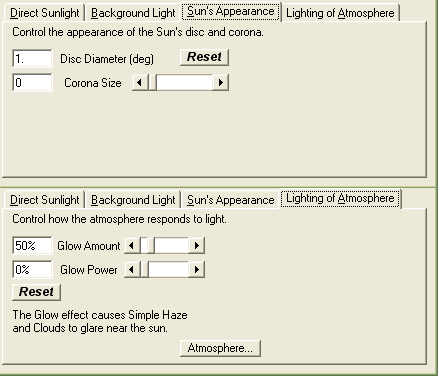
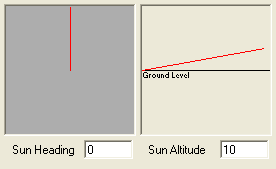
atmospheric haze preserved. Open up the “Lighting Conditions” dialogue, and adjust the suns
“Heading” and “Altitude” to 0 and 10 respectively:
Do a quick render and see how it looks. Kind of cool, but not what we want. We’d rather the sun
not be there. To accomplish this, set the “Disc Diameter” to .1, and the “Corona Size” to 0 in
the “Suns Appearance” tab. Also, in the “Lighting of Atmosphere” tab, set “Glow amount” to 50%,
and “Glow Power” to 0%. This should make the sun a tiny speck in your render that will easily
be erased later. Here are the settings I entered:
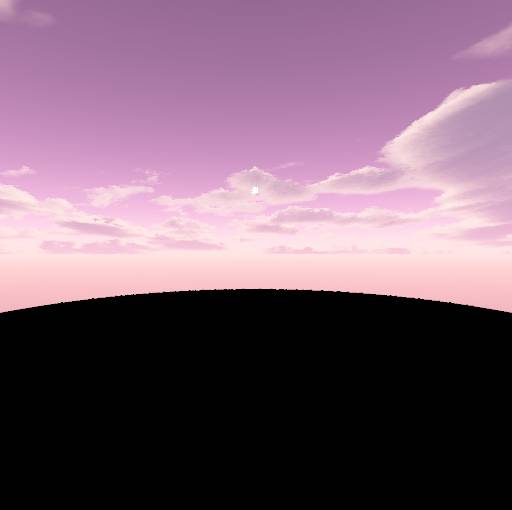
If you render it now, it should look something like this:
As you can see, all that’s left of the sun is that small circle in the center of the render. To
eliminate the sun entirely, simply set “Disc Diameter” to 0.
Capturing the Panorama:
First thing we’ll do is create a folder in your directory of choice. Terragen saves their
renders in the .bmp (windows bitmap) format, and these files can often grow very large, keep
that in mind when saving. Also, when saving, use logical nomenclature, like simply saving the
first image captured as “1”, and the second as “2”, etc. This will greatly ease the process of
stitching the images back together to form our panorama. So now, render an image from your
current camera viewpoint (this should be the coordinates I presented at the beginning of this
text), render your image and click “Save” on the image’s window. Again, make sure you use
appropriate names on your files. Now that we’ve saved that, we’re going to rotate our view, and
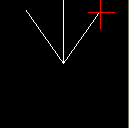
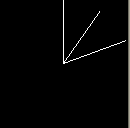
snap another shot. To accomplish this step, center your cursor over one of the camera’s bounds
indicators on the camera diagram on the “Rendering Control” dialogue, like the image on the left
below. Then right click, and your camera should have rotated to the position shown in the image
on the right.
Another, simpler way of doing this is to simply increment your “head” value by 35 degrees each
render. Now render your image, and save it as “2” or something similar. Rinse and repeat this
process until you have taken a full 360 degree shot of the cloudscape. Here’s a collective shot
of what all the images look like in order:
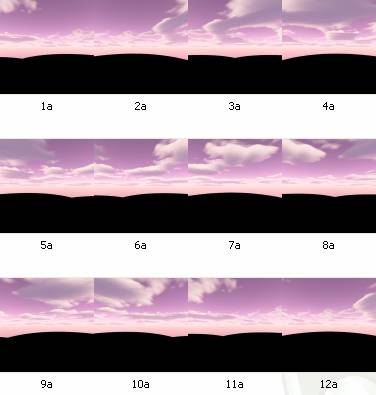
The first thing you’ll notice is that these won’t tile, there are huge seams between them. This
is not a problem though; we’ll fix it in a second. But the main reason for it tiling so awfully
(well, not tiling at all really) is that each time we took a render, we re-rendered half of the
previous one. This is particularly prevalent in 2a/3a, 6a/7a, and 10a/11a. We did this so that
we could eliminate as much of the perspective in each shot as possible, so that it will fit well
on our sky dome. It’ll make more sense later once we’ve stuck it all together. That wraps it up
for the Terragen section of this tutorial. To learn more about Terragen and it’s features, check
out
http://www.caroluk.org.uk/terratut/.
Section II.
Putting the Pieces Together With The GIMP
Placement:
Open up the GIMP and File>Open (ctrl+O) your first image in the series, in this case, “1a” for
me. First thing we’ll do is save our image as something else. Go to File>Save As (shift+crtl+S)
and save it as Panorama.jpg or something similar. We’re saving it as a jpg to keep the filesize
low, because in the end, this texture will wind up being very large, and .bmp is a very
inefficient file type. For example, if you take a look at the folder that holds all of your
rendered images, it should be around 9MB, and that’s only 12 images.
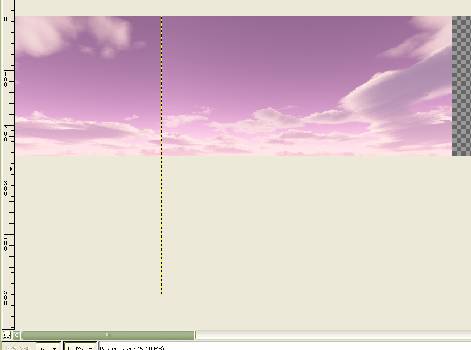
We’ll begin by resizing our canvas so that all the images will be able to fit on it. Go to
Image>Canvas Size and resize it to 3072 pixels wide, and 256 pixels high. I got the width by
multiplying the number of images by 256. 12x256=3072. The reason why it’s 256 is that, like I
said before, we’ll only use half of the image because we re-rendered half of each render. Also,
the height is 256 pixels because we’re simply cropping off the bottom half of the image (the
black part).
Now we actually add the other images. The way we’re going to do this, is to open each one, copy
and paste it, then put it where it needs to go. To do this, open your second image, File>Open
(ctrl+O), and select all of it, Select>All (ctrl+A). It should now have a moving white border
around all of it. Now copy it, Edit>Copy (ctrl+C), and then paste it onto your other image,
Edit>Paste (ctrl+V). It should now be a floating layer. In your Layer dialogue, Dialogues>Layers
(ctrl+L), make sure you have the floating layer selected, then right click on it and select “New
Layer”. The reason we’re keeping them on separate layers, is so that, should you make a mistake,
you won’t have to backtrack much to fix it. This is good practice on most all images you edit.
Now, select your movement tool (M), and drag the pasted layer 256 pixels to on the positive x
axis (to the right). In the GIMP it’s easy to tell how many pixels you’ve displaced your image.
At the very bottom of the image window, there is a bar with the coordinates while you’re moving
the layer. It’ should read “256,0” like so:
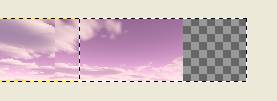
Your pasted layer should now be overlapping half of the original image like so:
Continue this process, until you have placed all of your images into this file. Remember that
each one moves over 256 pixels. Also note that I made a mistake, in that my 12th image is
entirely unnecessary, and can simply be forgotten about. And don’t worry if the pasted images
don’t reach the end of the image’s width, we’ll fix that later anyways.
After you have put all the images together, right click on a layer, then select “Merge Visible
Layers” and agree to “Expanded as Necessary”. Then right click on what should now be one huge
layer, and select “Layer to Image Size”. You should now have an image that looks like this
(but over 4 times the size):
You can see that the image repeats a bit as you go from the left side back to the right side:
To correct this, select the entire end of the image that tiles (including the alpha part, if
your dimensions were off, like mine):
Once you have that selected, go to Select>Invert (ctrl+I). Now that your selection is inverted,
go to Image>Crop Image, and it should cut off the end that isn’t selected.
Stitching:
This next part is tough because it relies more on skill and experience then a set method,
neither of which can be taught through a single tutorial, but I will go over the basic
techniques, and the rest is up to you.
So far, in your image, you should have a bunch of seams, but I will show you a couple
techniques to get rid of them completely. Firstly, we’ll use smudging and blurring. This is
great to get rid of a fine line, but has many limitations, including the fact that what ever
you smudge or blur becomes smoother, losing detail. Secondly, I’ll show you how to use the
clone tool to copy bits of your image and apply it to another part of the image. Just a note,
I generally work at 200% or 400% zoom for this part.
Smudging: For this technique we’ll primarily be using the “Smudge” tool (S). What this
tool does, is drag some of the color values from the where you begin to drag, into the color
values of where you end up. Experiment a bit with it on your image, and remember that ctrl+Z
will undo this if you make a mistake. When smudging, it’ll be important that we have a small
detail brush for the smaller parts of the image, like the small clouds at the bottom for
example, and a much larger, smoother brush for the large parts of open sky that need to be
blurred. For the finer brush, I could use the “Circle (13)” that is one of the default brushes.
But for the bigger one, we’ll have to make our own, bigger and smoother than the default
brushes. To make a new brush, select the small “New Brush” button at the bottom of the “Brushes”
dialogue that looks like a blank document. For my brush, I’ve entered the following:
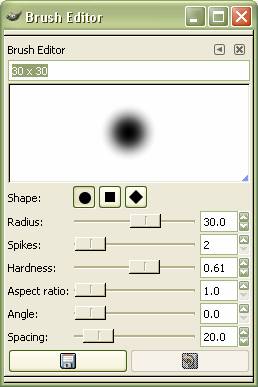
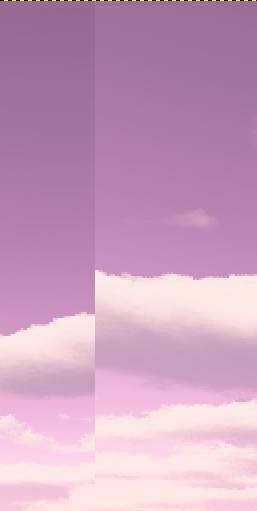
This will make a nice large smooth brush that will smudge well. Here’s a seam that needs to
be dealt with. We’ll use smudging to get it to look nice.
I’m going to use my large smooth brush for the open top part, and my finer brush for the little
clouds down below. After a couple minutes, my image ends up looking like this:
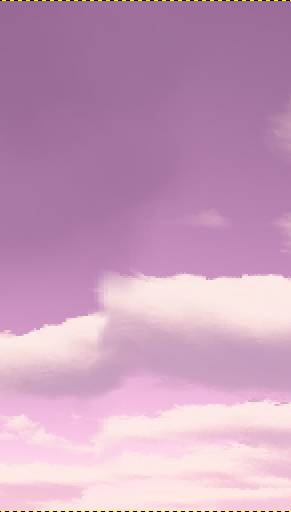
That looks pretty good except for that place in the middle, which is much too blurry for my
liking. To fix that, we’re going to need the clone tool.
Cloning: The clone tool (C) basically sets whatever you want as the brush (taken from
your image, or another image), and allows you to paint with that. This is really helpful for
traditional tiling especially, since you can take different parts of an image and put them
over any other part. The way you do this is you select your source image by putting your brush
over the image and then ctrl+Leftclick on where you want to start the source from. Take some
time now to play around with it, and remember to use ctrl+Z if you make mistakes. I’m going to
pull a bit of my image and place it over that ugly blurriness.

There, that looks much better to me. There’s not much else I can help you with on this, it
basically comes down to whether or not you have an eye for it, and the skill to pull it off.
Don’t be afraid to undo and redo things over and over again to get it the way you want it.
Finish erasing the seams on the entire texture, and then we’ll move on to actually making it
formatted correctly for use in the game engine. Here’s what I had by the end:
Polarization:
To make the texture suitable for a sky dome, we’re going to have to make it round. To do this, we will
use the “Polar Coords” filter in the GIMP, but we need to do a couple things first. The first
thing we need to do will make your image very large. If you have a slow or old machine, save
before you do this, because the GIMP does not handle the images in your memory very well. Also,
right here, I will make an error to show you the results. This is why we didn’t want to have
clouds touching the top boundary of the image.
That being said, go to Image>Scale Image and scale the height to whatever the width is. For
example, my image is 2670 pixels wide, and 256 pixels tall, I click the chain icon (to break it),
and enter 2670 in the height field, and press ok. Now my image is huge and stretched, but no
worries, this is what it should look like. Now this part is the bit you may wish to watch out
for if you have and older machine. Got to Filters>Distorts>Polar Coords. “Circle Depth in
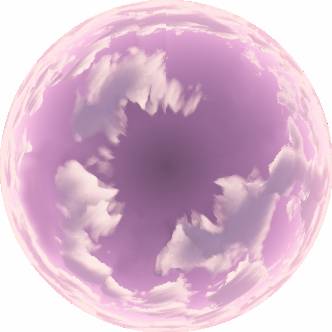
Percent” should remain at 100, and “Offset Angle” should remain at 0. I press ok and…
Presto! Almost. Because I had some clouds touching the top of my image, they were drawn
together and look really awful. To correct this, go back to the step just before you scaled up
the height a lot (using ctrl+Z). Go to Image>Canvas Size and make the height 384 pixels. Next,
set the Y offset to 128, and accept. Your image should now look something like this:
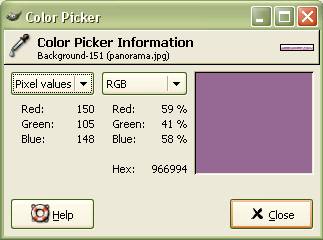
Right click on the background layer in the layer dialogue, and click “Layer to Image Size”. Then
select your “Color Picker” tool (O) and select a color from the topmost part of the sky. This
was my color:
Next, select your magic wand tool (Z), and click on the white part at the top of the image
(where you added the new canvas), and then, using the “Fill” tool (shift+B), fill the selected
area with your color.
Now, using the “Smudge” and “Clone” tools, fill in the tops of the clouds where they were cut
off. If you saved your Terragen file, you can go back and render more clouds to use with the
“Clone Tool”. After you’ve finished this, do what we did before: scale your height to the same
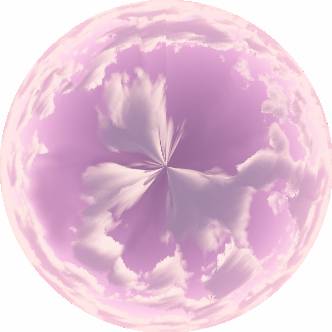
as your width, and run the “Polar Coords” filter. If all goes well you should end up with
something like this:
That looks more like it! Eliminate the seam at the top middle of the texture using the
techniques I’ve taught you, and then we’re mostly good to go. The next thing to do is save
this texture at an appropriate size. Because it’ll be pretty big, MAKE SURE it’s saved as a
power of 2 (2, 4, 16, 32, 64, 128, 256, 512, 1024, 2048, etc.). If I wanted it to look really
good, and didn’t care too much how large my file will be or about load time, I’d put it at
2048, since that’s a really nice resolution. But for me, I’ll keep it more modest, and save it
at 1024x1024. For more information on the GIMP, visit
http://docs.gimp.org/.
Section III.
Making and Texturing the Skydome In Blender
Open up Blender, and right click on the default cube and delete it (X). Center the 3D cursor at
the origin of your graph by left clicking, then snapping it to the grid (shift+S, Cursor to
Grid). Now we’ve gotten that out of the way, we’ll make the object that we’re actually going to
map the texture to. Go to the top view (num+7) and add an “Icosphere” (Space>Add>Mesh>Icosphere,
Subdivisions: 2) Note that if you’re picky about your geometry, I’d recommend 3 subdivisions.
Now switch to a side view (num+1, or num+3), and enter “Edit Mode” (tab), if not already there.
Select all of the vertices (A), and scale it to .5 on the Z axis (S,Z,.5). Now we should have a
flattened sphere like so:
Now box select only the lower half of the object like so:
And then delete those vertices (X, Vertices). We should now have
1/
2 of a sphere left. Now select
all of your faces (A) and click on “Draw Normals” in the edit buttons, under the “Mesh Tools 1”
tab. Now you should have a bunch of blue lines emanating from each face. These show you which side
of each face a texture will be applied to. If you look at a face and the normal is not facing
you, it will be invisible. Right now all the face normals should be facing the outside of the
dome, but this isn’t good, since the scene will be inside the dome. To correct this, select
all your faces, and click “Flip Normals” in the edit buttons under the “Mesh Tools” tab.
Alternatively, you can recalculate your normals inside (ctrl+shift+N). A couple more things
before we slap our texture on here. Select all your vertices (A) and then click “Set Smooth”
in the “Links and Materials” tab in the edit buttons. This will make it so that the scene’s
lighting will react semi-realistically to the light source.
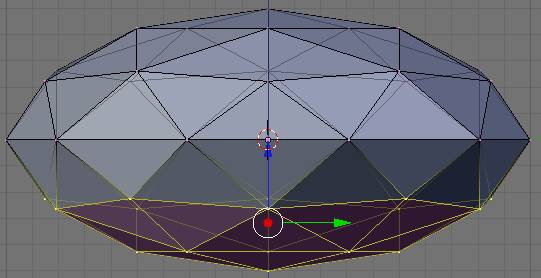
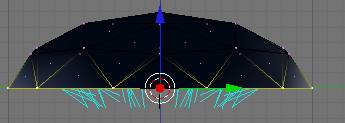
Next, we’re going to select all the vertices along the bottom of the dome like so:
Scale them to 1.2 times their size to get rid of the sharp falloff they create. Then subdivide
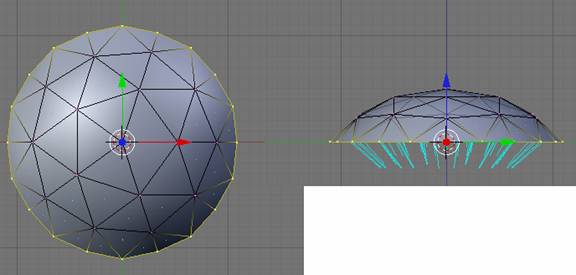
them (W, Subdivide). From the top view (num+7), select only the recently created vertices from
your subdivision, and scale them outwards far enough that it rounds out the edges of your
figure. All together, your mesh should look like this:
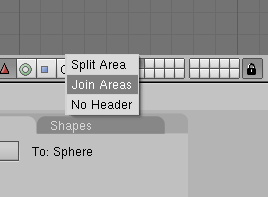
Next, go to “Object Mode” (tab), then “UV/Face Select Mode” (F), and your object should be
white. Select all of the faces on your mesh (A). Now right click on the tiny black bar between
the 3D view and the editing buttons, and select “Split Area”. Split the 3D view to your liking:
In the bottom leftmost corner of your new view, click on the icon that looks similar to a grid.
From the menu that appears, select “UV/Image Editor”. You should now have a small grid with a
blue triangle in the center. With your mouse in the UV window, LSCM unwrap your mesh (E). You
should now have a round, spider web-like group of wires. These are actually your 3D object,
unwrapped to be 2D. Now load your image (Image>Open). And it should already be mapped right on.
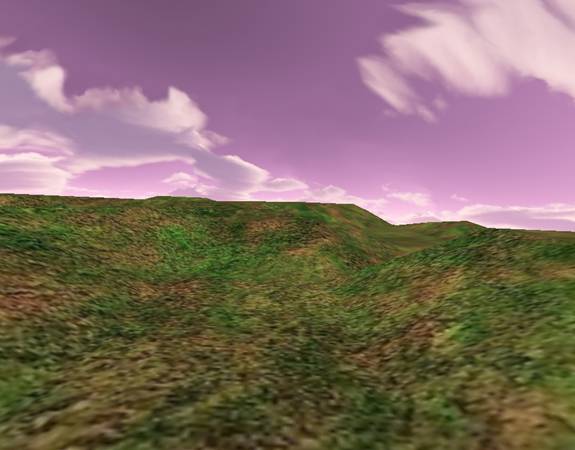
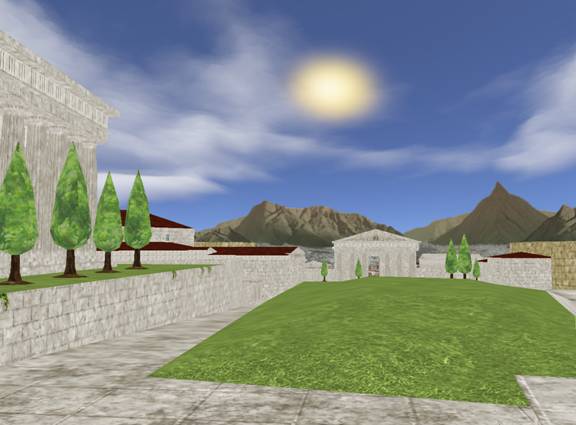
Now, in the 3D view, switch to textured view (alt+Z), and voila! We have a purdy sky. Here,
I’ve plopped it on a 5 second landscape.
And here is the same effect in a project I’ve been working on.
For more about UV texturing, go here:
http://biorust.com/index.php?page=tu...etail&tutid=85
Section IV.
Extensions
Making a Sun:
Well, our sky looks pretty nice, but it’s lacking the thing that would actually allow us to
exist, the sun. To make it, open up the GIMP and create a new image at 256x256 pixels. Before
you accept, click the + next to “Advanced Options”, and open the drop down menu where it says
“Fill With:”. From this menu, select “Transparency”. Next, we’ll create a new layer (Layer>New
Layer). On this layer, using your box select tool, make a series of smaller squares,
alternating black and white (use the fill tool to add the colors). It should end up something
like this.
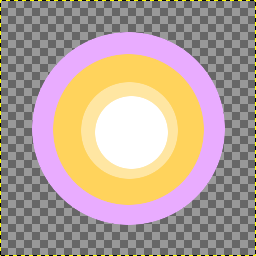
The order that I put them in is there for a reason. The way this will work, is that these are
guides for the oval selection tool. The reason why the outside one is so small is that it’ll
be a soft pink color, but we don’t want that to overpower the rest of the sun. The second
color, that gets the most space, will be a yellow, and the next, small strip is an even lighter
yellow. The center will be white. Now, using your oval selection tool and the fill tool, create
all these colors, each on it’s own layer. Go from largest circle to smallest. Use the “Opacity”
slider in the layer dialogue to make it so that you can still see your black and white guide
layer. You should end up something like this.
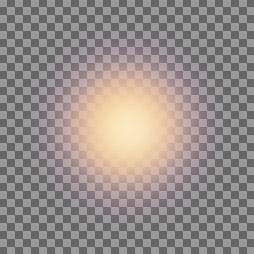
Now, delete the layer with the black and white boxes (Layer>Delete Layer). Then, right click on
any of the visible layers, and select “Merge Visible Layers”. They should all compress into a
single layer. Now, on this next step, the last thing we want will be for the sun to touch the
boundaries of the image, because that will create sharp edges, which the sun doesn’t have. To
fix this, scale the canvas size to about 384x384 (Image>Canvas Size). Make sure you click
“Center” during this operation. Next, right click on your layer and select “Layer to Image
Size”. Ok, now we have all of that out of the way, go apply the “Gaussian Blur” filter
(Filters>Blur>Gaussian Blur). Set the “Blur Radius” to 100 in box the x and y fields. Press ok,
and it looks like we have our sun! But we aren’t quite done. Scale your image to 128x128
(Image>Scale Image). Then save it as a .png, so that it preserves the transparency we gave it.
It should now look like this.
Now to put this in Blender, map it the same way we did the sky, but in the “Edit Buttons”
(while in “Face Select Mode”), click “Alpha” under the “Texture Face” tab.
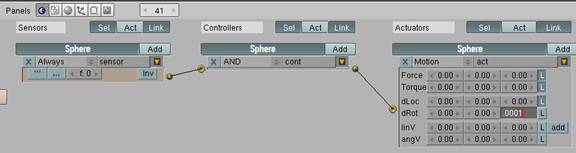
Making the Sky Dynamic:
This is a pretty simple step. To make the sky simply rotate, which usually looks good enough,
go you your “Logic Buttons” and enter the following:
For advanced users, you could alpha the background of a sky, leaving only the clouds, and then
set it up so that you have multiple moving cloud layers. It’s also possible to achieve
day/night effects and switches, using the color and alpha IPOs in Blender.
Finish:
That about wraps it up. It’s possible to achieve very professional quality skies with this
method, it’s just basically up to you and how much time and energy you’re willing to put into
it.
-DIM
Back to the tutorials index...
Website design by Tony "blendenzo" DiRienzo. All content © Copyright Tony DiRienzo unless otherwise noted.