 |
|||||||||||||
| News | Tutorials | Games | Downloads | Links | Contact | ||||||||
 |
 |
|
 |
||||||||||
Featured Author: -Social-
|
Tutorials - Blender Game Engine
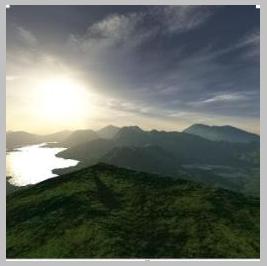
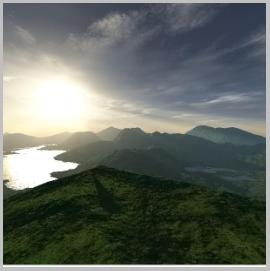
Making a Seamless Skyboxby SocialThis tutorial is intended for beginners, but the process is informative even for the more experienced. I will go through the entire method step by step, so even if you never made a skybox before (or more importantly a seamless skybox), you'll be able to follow along, and learn. *Basic knowledge of the blender interface is assumed, as are reading and comprehension skills* A) Texture Acquisition and Modification: 1. Choose your favorite skybox texture set (usually this will consist of 5 individual images (1 top, 4 sides) , usually around 512X512 pixels each, warped properly so as to give a decent illusion of open space when mapped to the inside of a cube), if you don't have your own texture set, you can download one from here: http://www.3delyvisions.com/skf1.htm You can find an even greater selection of skybox textures in this thread: http://blenderartists.org/forum/showthread.php?t=64228 (if you find any additional sites which contain free skybox textures for download, please post the links to those sites in that thread as well, so that I can update the initial list) Because there is something about sunsets that calms me down, I will choose the "sky8.zip" texture set:
^If you are a beginner, it would be best to use the same exact texture set as I am using, so as to lower your chances of possible confusion later.^ 2.Open any one of the 5 images with the image editing software of your choice (Photoshop, GIMP, whatever..). If you don't have photoshop you can download GIMP and use it for free (magic of Open Source software), or if you don't want to be bothered with any of that, you can just as easily use MSPaint, which is available by default on any PC running Windows. Since it's so universal, I'll use MSPaint (meaning that theese tutorial instructions are specific to MSPaint, but the principles of what we are doing with the images are the same, no matter what software you use). I will start with the "front62.jpeg" image, from the "sky8" texture set, but as I said earlier you can start with any image you want. Considering that you are reading this tutorial and know how to use the internet to load web pages, I will assume that you know the basics of MSPaint, and therefore know how to extend the work area. (by work area I mean the white background that is visible when you A: extend it, or B: make an image smaller than it's original size). That said; extend the work area to the right by 10 pixels, and then extend the bottom down by 10 pixels (you can view the pixel number values in the bottom right corner, when you extend any given side). Now take the actual image and set it in the dead center of the workspace, so that there are 5 pixels between the sides of the image and the edges of the workspace. Your image should now look something like this (note the white outline):
Now the key part: Because of Blender's automatic texture smoothing function, any sharp change in color information on your texture will in turn produce a blurred line inbetween the intended "pixel sharp transition". Also these "blurs" will show up on the texture edges. (this is what causes the seams, but simply scaling down the uv map won't make things line up right, because the seam that your trying to get rid of is not just a blur, "it's a blurred part of the texture". So in turn; getting rid of the seam will get rid of the texture data which is needed to make things line up seamlessly.) My workaround to this problem is to simply continue the texture for an additional 5 pixels on all the relevant sides. This will give you a nice buffer between the texture and the seam, assuming that you fill that buffer with a "seamless" continuation of the texture. You can't simply fill it with any given color, because blenders smoothing would pick it up and make the seam anyway. You would have to "paste from" other skybox images, and have them line up seamlessly with all the relevant sides of the texture you are currently editing, efficiently filling up the "5 pixel buffer" with a seamless continuation. So for the front image you would have to paste from all the other textures that are supposed to be in contact with it. Those would be all the textures except for the "back62.jpeg", and you would have to rotate them and move them so that they line up with the texture you are editing. Now by those instructions, go ahead and edit your texture. The result should look something like this: (Note the white corners at the top)
Now we also have to get rid of those corners, and to do that (might want to zoom in for this) just copy paste a slightly larger (than the corner) patch from right next to the corner (so that things will match), and use that patch to "cover" the corner. The white line at the bottom we can just leave alone, because the player is never going to see that anyway (unless you want him/her to fly, in which case the same skybox principles apply, only with one extra side to work with). Finally, you should end up with this:
If you "get the picture" (pun), go ahead and save it as "front" (don't save it as "front62" because you want to keep the original texture unchanged, so that you can paste from it with less difficulty, and also it can serve as a backup in case you screw anything up later.) Now do the same thing with all the other textures in the set. (only note: that for the "top62.jpeg" image, you will have to paste from all 4 sides as opposed to three, and you will have 4 corners to take care of instead of 2). B) Model set up, and UV mapping. 1. Now that you have your two sets of skybox textures (one original set, and one modified), you can go on ahead: Fire up Blender, delete the default light source (so it doesn't get in the way, you can also delete the default camera if you want, or alternatively you can move both of these to a different layer by selecting them and pressing [M], OR if these objects don't bother you, then leave them be). Select the default cube, go into edit mode [TAB], (make sure all vertices are selected if not already), press [W] and from the menu that pops up select "Flip Normals". We flip the normals because they initially face outwards by default, and since the UV textures we intend to apply only show on the normals, we want the normals to face inward. Exit edit mode [TAB], go into face select mode [F]. 2. Split your main 3D view in two and select to have the UV editor on the right side. Put your mouse over the 3D view on the left. If you are not already in top view, press [7] on the num pad. You are now looking straight down at the "Top" face of your cube. The faces on the side are in following relation: --F L T R --B T = Top L = Left R = Right F = Front B = Back Select the Front face (only the Front face), now in your UV Editor window, go to "Image" >> "Open", then find the directory where you saved the "modified" skybox images and open the "front.jpeg" image (this is the image you "modified", DO NOT use the original "front62.jpeg" image). The image shows up in your UV editor. In your 3D window, go into textured mode [Alt+Z] to see your image on the box side. In 3D view, the texture might be applied sideways, but this is easy to fix by hitting "R" >> "Rotate Uv Coordinates", which will rotate the texture on the face. Do this until the texture is set right. Do the same procedure for the rest of the sides, so that they line up with eachother. (don't worry about the seams, we will get rid of them shortly) C) Scaling the UV map. Now that you have all your images set up right on each side, it's time to get rid of those seams. In your 3d window, select "ALL" the faces, in the UV editor window, make sure that "ALL" the vertices are selected. Now in your 3d window, set your view to be in the middle of the skybox so that you can see the skybox around you. Go to the UV editor window, go to "view" and check the "Update Automatically" option, which will show the changes you make in the uv editor, translated instantly to the 3d window. In your UV editor scale down the uv map by pressing [S] and moving your mouse (you can hold [Shift] to make fine tuned movements). As you slowly scale down your UV map you should see things starting to line up in the 3d window, and when they line up so that you can no longer see any edges or seams you are finished. Assuming you did everything right, you should now have a completely seamless skybox. Epilogue: Please keep in mind that there are other ways to do this. This is just my method. Alternatively you don't even have to go with a "skybox", you can get pretty decent results with a "skydome" all for much less trouble. I prefer to use a skybox because it's somewhat of an industry standard (or was), and also because I find pleasure in forming a seamless enviroment with nothing more than a Cube. I just find something very clean and neat about that. Social Back to the tutorials index... |
|||||||||
|
|
||||||||||
|
||||||||||


Website design by Tony "blendenzo" DiRienzo. All content © Copyright Tony DiRienzo unless otherwise noted.