


Making Colored Text for the BGEby blendenzowith special thanks to ashsid Recently, fellow users at blenderartists.org have been asking me how I created the colored bitmap text I posted in my thread "Freebie: Bitmap Text Pack (1 Font, 16 Crazy Variations)". Instead of answering the same question in multiple PM's, I decided to write a quick tutorial. Of course, it's been a while since I wrote a tutorial, so I had forgotten that there is nothing quick about it. Prerequisites: To begin with, I assume that you already have The GIMP. It probably came pre-installed with your Linux distribution, but if it didn't, you can get it from your distro's repository or download and compile the source from gimp.org. Windows users can get a Windows port of The GIMP at the gimp-win sourceforge page. You should have a basic knowledge of The GIMP interface, but that is not completely necessary to follow this tutorial. You will need to know how to use bitmap text in the Blender Game Engine, and if you hope to use a custom font, you will need to know how to generate bitmap font images that can be used with Blender. Neither of these topics is covered in this tutorial. Files: If you would like to follow along with the tutorial, you will need to download the ColorText-ExampleFiles package (512 KB, zip). Goal: The standard white bitmap text images for the BGE can be rather boring, and even those who know how to add color often have trouble making black text. This tutorial will teach you how to properly add color to your boring white text using the GIMP. Here's a before and after comparison of what we will achieve: 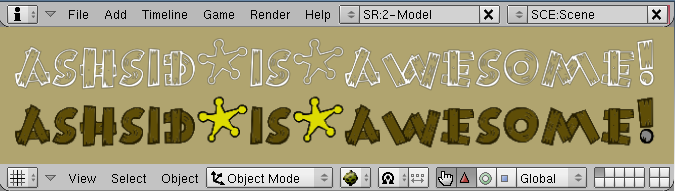 To simplify things a bit, we'll split the tutorial into the following sections: Preparing the Image
If you haven't already downloaded the example files you should begin by
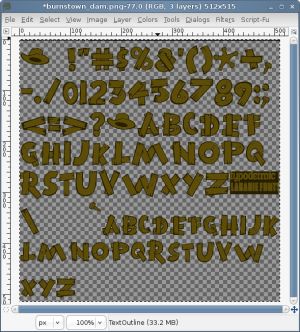
doing that. In the zip package, you will find a file named burnstown_dam.blend. (I generated the PNG text image in this file from the free
Burnstown Dam font by Ray Larabie using
ashsid's Bitmap Font Creator script.)Begin by opening burnstown_dam.blend in Blender. If you press the [P key] over the 3D Viewport now, you should see something like the image below. 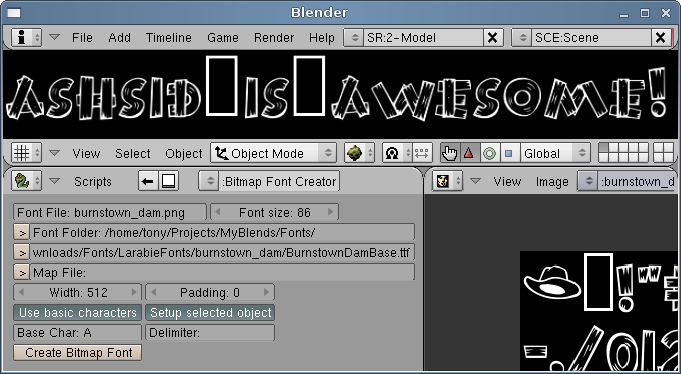 Some bitmap fonts take a little bit of cleaning up before they're usable, so we may as well start by removing the ugly white squares that are showing up where there are supposed to be spaces. Load up burnstown_dam.png in The GIMP and let's get to work... Before you do any editing on the image, there is one important thing that you must know. Do you see the little black and white dots at the top of the bitmap font? Look at the magnified image below to see what I'm talking about. 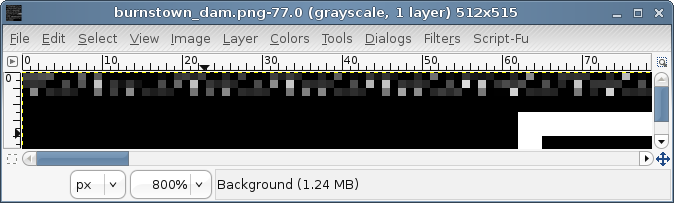 Those dots tell Blender how to map the text file, so it's crucial that we don't alter them. Don't worry too much if you accidentally edit them, though. Just press [Ctrl + Z] to undo your mistake, or switch to the handy undo panel on the Layers, etc. window in The GIMP and go back as many steps as necessary. Now to handle those pesky white spaces. Since the current background color of the text image is black, we'll just fill in all of the white areas that we don't want with solid black. Use the Rectangle Select tool [R Key] to surround the white box (as shown below), Then pick the Bucket Fill tool [Shift + B] and make sure your fill color is set to black (the Bucket Fill tool is highlighted in the image below). Select "Fill whole selection" in the tool options window, then click over the selected area to fill it. Repeat this to remove all of the unwanted areas from the text image. 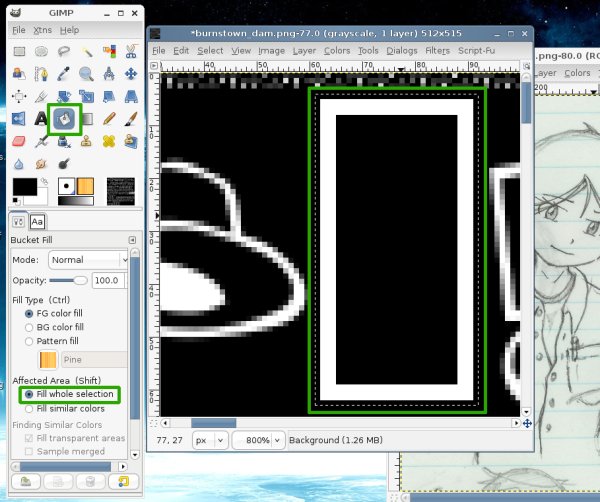 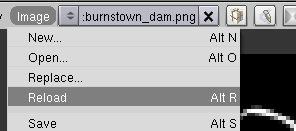 Save the changes that you've made [Ctrl + S], then go back to Blender to see the changes. Since the bitmap font is packed in the .blend file, the
changes won't take effect immediately. We will need to reload the texture in order to see the results of our work (see the image to the right if
you don't know how to do this). Now when you play the game file, you should see something like the image below.
Save the changes that you've made [Ctrl + S], then go back to Blender to see the changes. Since the bitmap font is packed in the .blend file, the
changes won't take effect immediately. We will need to reload the texture in order to see the results of our work (see the image to the right if
you don't know how to do this). Now when you play the game file, you should see something like the image below.  That's already much better, if I do say so myself, but it's still not the colored text we're hoping for. We've got one more big problem to deal with, though. The bitmap font that ashsid's script generated is a grayscale image. We need to switch the mode in order to accomodate color. In the GIMP window for burnstown_dam.png, open the Image menu, then navigate to the Mode submenu. Select RGB and the image will be converted. 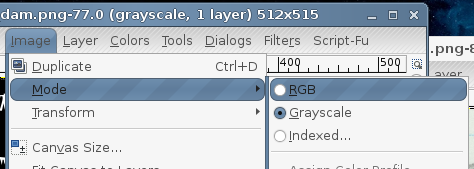 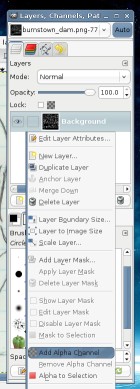 The black background that the image currently has is really not a good thing. As long as the background is black, we won't be able to color the
text black (or any very dark color, for that matter) and expect it to show up properly in Blender. This is because Blender correctly interprets
black background as the transparency color, or alpha. In order to use dark colors, we will need to make the background of the image truly
transparent in The GIMP. The first step to accomplishing this is adding an alpha channel to the "Background" layer. As long as the Background
layer in The GIMP doesn't have an alpha channel, it cannot be given a transparent value, and no other layers can be moved below it in the image
stack. Right-click "Background" in the Layers window and select "Add Alpha Channel" as shown in the image to the left.
The black background that the image currently has is really not a good thing. As long as the background is black, we won't be able to color the
text black (or any very dark color, for that matter) and expect it to show up properly in Blender. This is because Blender correctly interprets
black background as the transparency color, or alpha. In order to use dark colors, we will need to make the background of the image truly
transparent in The GIMP. The first step to accomplishing this is adding an alpha channel to the "Background" layer. As long as the Background
layer in The GIMP doesn't have an alpha channel, it cannot be given a transparent value, and no other layers can be moved below it in the image
stack. Right-click "Background" in the Layers window and select "Add Alpha Channel" as shown in the image to the left.Now we need to make the background transparent. The easiest way that I've found to do this is to move the text to another layer and delete everything but the mapping dots from the background layer. Use the Rectangle Select tool [R Key] to select everything in the background layer except the mapping dots in the top few lines. Now click Cut from the Edit menu, or press [Ctrl + X]. You should see a gray checker-board pattern where the font was, indicating that the background is now transparent. Now we need to move the text to a separate layer to color it. This particular font has an outline and an inner space, so we'll make two copies of the text to work on the outline and inner space individually. Click the "New Layer" button in the Layers window twice, then choose each of the new layers and press [Ctrl + V] or pick Paste from the Edit menu to add the text to them. (You will need to anchor the text to each layer. To do this, click the "Anchor" button in the Layers window.) You won't be able to see the gray checker-board anymore, but that's only a temporary problem. Once these steps are completed, the image is ready to be masked. Masking the Image
A layer mask in The GIMP defines the areas of a layer that should remain transparent regardless of fill color. Layer masks are grayscale
images in which black is considered full transparency, and white is considered full opacity. If we use a layer mask to define the area outside of
our text as transparent, then we can indiscriminately fill the entire layer with the color we want our text to be. The mask will make sure that
the color only applies to the text.Right click the layer which contains the text image and choose "Add Layer Mask" from the pop-up menu. The Add Layer Mask dialog will then be displayed. Click "Grayscale copy of image", then click the "Add" button. 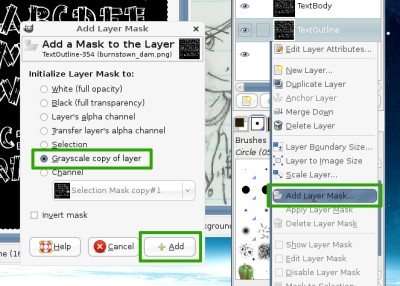 If this were a font with solid text, we would be ready to color now. However, this layer mask simply makes all of the black in the text image transparent, which makes the spaces inside the outlines transparent as well. Since we would like to color those inner spaces, we will need to take a few more steps to make the image ready. Switch to second layer of text that we added, and choose the Fuzzy Select Tool [U Key]. Set the threshold on the tool to 75.0 make sure the other settings match the image below. Now click on the black area around the text to select it, then press the [Delete key] or select Clear from the Edit menu. You should see something like the image below. 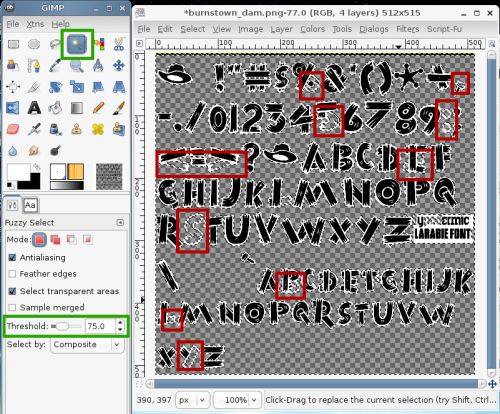 Notice all of the areas highlighted in red. These are areas where the inner space of the text was deleted. This occurs because of gaps in the outline. Press [Ctrl + Z] to undo the deleting of the black area, then select the Paintbrush tool [P key] and set it to white with a very small brush. Zoom in on the characters in the text image that you identified as having gaps and use the paint brush to fill the gaps in. Fuzzy select the outer black again and delete it. Look for more gaps, then undo the delete and paint the gaps you found again. Repeat this process until all of the gaps are filled and every letter still has black in it's inner space when you press the delete. Once you've identified and filled all of the gaps, undo the deleting of the black area once again, then right-click the current layer in the Layers window. Click "Add Layer Mask" and select "Grayscale copy of image" again, but this time check the box labeled "Invert mask." Now add the layer mask. 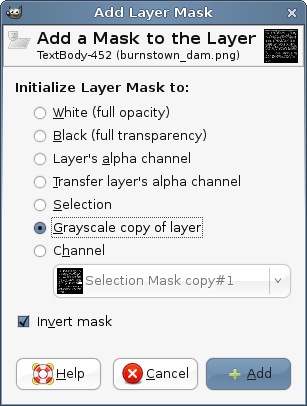 Look at the Layers window and make sure that the layer itself is active, and not its mask (see the image below). Select the black space surrounding the letters one last time and delete it. Now check the "Preserve Transparency" box for this layer (located in the Layers window, see the image below). 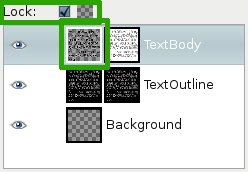 That's the final step in masking the image. Now we're ready to color. For reference, your text image should now look like the image below. 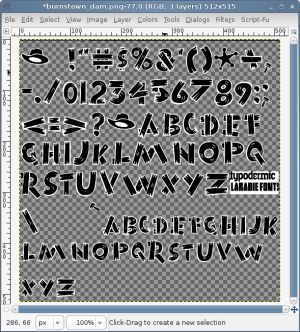 Coloring the Image
Coloring the image is simple, now that we've taken the time to properly prepare it. Simply select the text outline layer and use the Bucket
Fill to flood the whole layer with that color. The layer mask should do its job, and the color will only apply to the text outline. Do the same
for the other text layer using the inner color for you text. (I've chosen #271f00 for the outline and #5e4d07 for the inner color.) Check the
mapping dots to make sure that neither fill operation covered them up. If they were obscured, then use the Rectangle Select tool to select their
space and delete whatever is covering them on the other layers. Below you can see what my image looked like at this point in the process.
 At this point you should save your file again (if you haven't already). You'll notice a dialog popping up this time informing you that your image uses layers, which the PNG format does not support. Select "Merge Visible Layers" and click OK. Do not select "Flatten Image," as this will destroy the background transparency of the image. Once you've saved the file, go back to Blender and reload your image once again. Launch the game engine (by pressing the [P key]), and you should see the new colored text instead of the boring old white text. 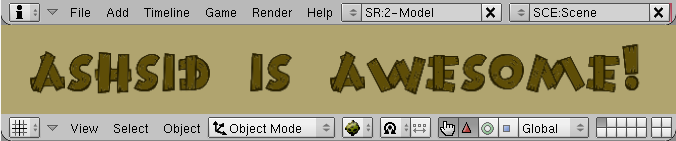 Changing the color of individual characters or groups of characters in your font is also very easy. Just rectangle select the area that you want to change, then fill it with a new color. You can see in the following image that I changed the color of the sherrifs badge (the star) and the cowboy hat. Also, I've colored the punctuation marks gray, since they are supposed to look like nails. 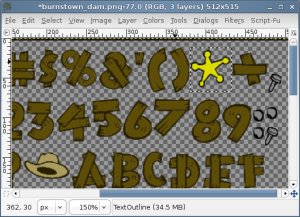 Because I made the background of the text image truly transparent, the border around the sherrif's badge displays fine in the BGE, even though it is black. Here you can see a before and after comparison of the in-game text. I sure you'll agree with me that the colored version looks much better. I hope you found this tutorial useful. If you have any questions, or if you feel like I need to clarify more on a certain point, feel free to contact me about it. -blendenzo Back to the tutorials index... Website design by Tony "blendenzo" DiRienzo. All content © copyrighted to its repsecitve author. | ||||||||||||||||||


