Particle Effects
The particle system of Blender is fast, flexible, and powerful. Every Mesh-object can serve as an emitter for particles. Halos (a special material) can be used as particles and with the Duplivert option, so can objects. These dupliverted objects can be any type of Blender object, for example Mesh-objects, Curves, Metaballs, and even Lamps. Particles can be influenced by a global force to simulate physical effects, like gravity or wind.
With these possibilities you can generate smoke, fire, explosions, fireworks, flocks of birds, or even schools of fish. With static particles you can generate fur, grass, and even plants.
A first Particle System
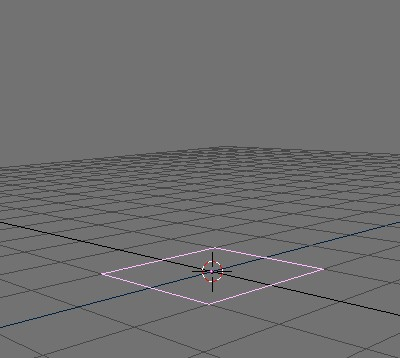
Reset Blender to the default scene, or make a scene with a single plane added from the topview. This plane will be our particle emitter. Rotate the view so that you get a good view of the plane and the space above it (Figure 3).
Switch to the AnimButtons (F7 or
 ) and click the button "NEW Effect" in the middle part of the window.
Change the dropdown MenuButton from Build
to Particles. The ParticleButtons are
shown in (Figure 4).
) and click the button "NEW Effect" in the middle part of the window.
Change the dropdown MenuButton from Build
to Particles. The ParticleButtons are
shown in (Figure 4).
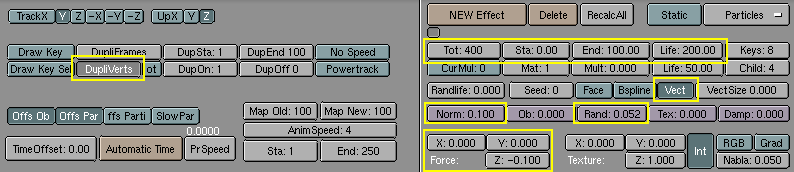
Set the Norm: NumButton to 0.100 with a click on the right part of the button or use SHIFT-LMB to enter the value from the keyboard.
Play the animation by pressing ALT-A with the mouse over the 3DWindow. You will see a stream of particles ascending vertically from the four vertices.
Congratulations - you have just generated your first particle-system in a few easy steps!
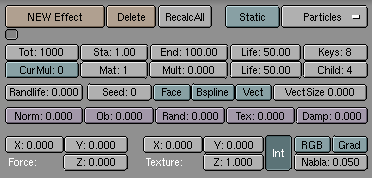
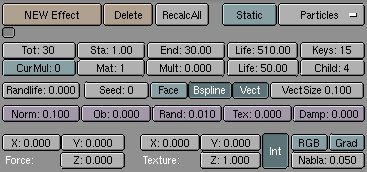
To make the system a little bit more interesting, it is necessary to get deeper insight on the system and its buttons (Figure 5):
The parameter Tot: controls the overall count of particles. On modern speedy CPUs you can increase the particle count without noticing a major slowdown.
The total number of particles specified in the Tot: button are uniformly created along a time interval. Such a time interval is defined by the Sta: and End: NumButtons, which control the time interval (in frames) in which particles are generated.
Particles have a lifetime, they last a given number of frames, from the one they are produced in onwards, then disappear. You can change the lifetime of the particles with the Life: NumButton
The Norm: NumButton used before made the particles having a starting speed of constant value (0.1) directed along the vertex normals. To make things more "random" you can set the Rand: NumButton to 0.1 too. This also makes the particles start whith random variation to the speed.
Use the Force: group of NumButtons to simulate a constant force, like wind or gravity. A Force: Z: value of -0.1 will make the particles fall to the ground, for example.

This should be enough to get you started, but don't be afraid to touch some of the other parameters while you're experimenting. We will cover them in detail in the following sections.
Rendering a particle system
Maybe you've tried to render a picture from our example above. If the camera was aligned correctly, you will have seen a black picture with grayish blobby spots on it. This is the standard Halo-material that Blender assigns a newly generated particle system.
Position the camera so that you get a good view of the particle system. If you want to add a simple environment, remember to add some lights. The Halos are rendered without light, unless otherwise stated, but other objects need lights to be visible.
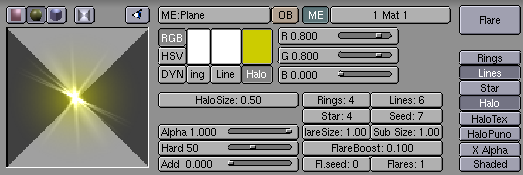
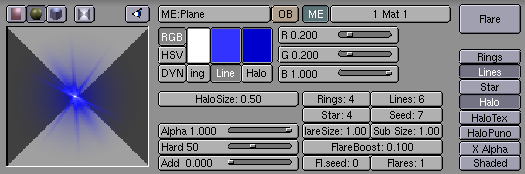
Go to the MaterialButtons (F5) and add a new material for the emitter if none have been added so far. Click the Button "Halo" from the middle palette (Figure 6).
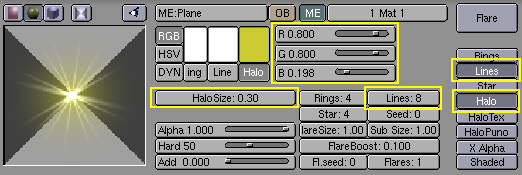
The MaterialButtons change to the HaloButtons. Choose Line, and adjust Lines: to a value of your choosing (you can see the effect directly in the Material-Preview). Decrease HaloSize: to 0.30, and choose a color for the Halo and for the lines (Figure 6).
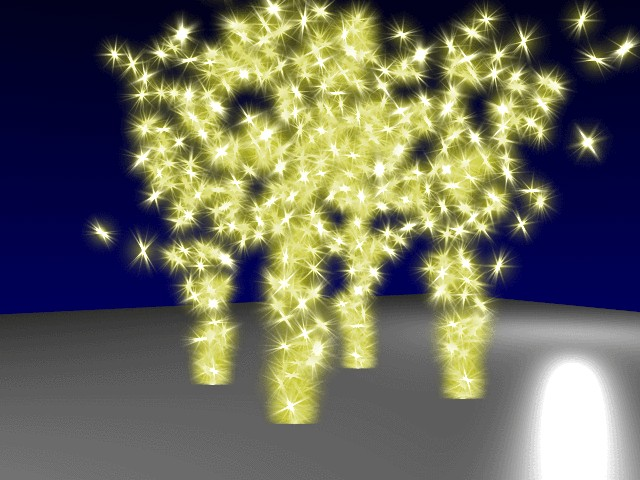
You can now render a picture with F12, or a complete animation and see thousands of stars flying around (Figure 7).
Objects as particles
It is very easy to use real objects as particles, it is exactly like the technique described in the Section called Dupliframes in the chapter called Special modelling techniques.
Start by creating a cube, or any other object you like, in your scene. It's worth thinking about how powerful your computer is, as we are going to have as many objects, as Tot: indicates, in the scene. This means having as many vertices as the number of vertices of the chosen object times the value of Tot:!
Scale the newly created object down so that it matches the general scene scale.
Now select the object, then SHIFT-RMB the emitter and make it the parent of the cube using CTRL-P. Select the emitter alone and check the option "DupliVerts" in the AnimationButtons (F7). The dupliverted cubes will appear immediately in the 3DWindow.
You might want to bring down the particle number before pressing ALT-A (Figure 8).
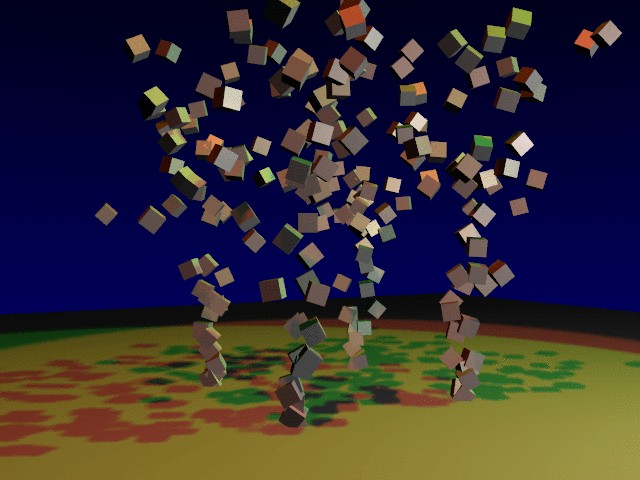
In the animation you will notice that all cubes share the same orientation. This can be interesting, but it can also be interesting to have the cubes randomly oriented.
This can be done by checking the option Vect in the particle-parameters, which causes the dupli-objects to follow the rotation of the particles, resulting in a more natural motion (Figure 8). One frame of the animation is shown in (Figure 9).
 | Original Object |
|---|---|
Take care to move the original object out of the cameraview, because it will also be rendered! |
Making fire with particles
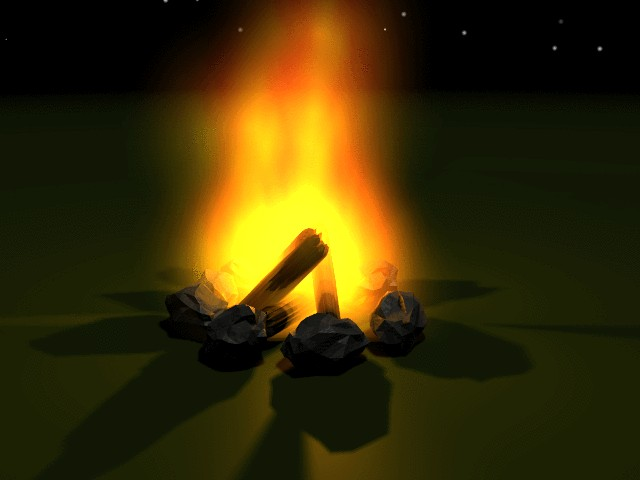
The Blender particle system is very useful for making realistic fire and smoke. This could be a candle, a campfire, or a burning house. It's useful to consider how the fire is driven by physics. The flames of a fire are hot gases. They will rise because of their lower density when compared to the surrounding cooler air. Flames are hot and bright in the middle, and they fade and become darker towards their perimeter.
Prepare a simple setup for our fire, with some pieces of wood, and some rocks (Figure 10).

The particle system
Add a plane into the middle of the stone-circle. This plane will be our particle-emitter. Subdivide the plane once. You now can move the vertices to a position on the wood where the flames (particles) should originate.
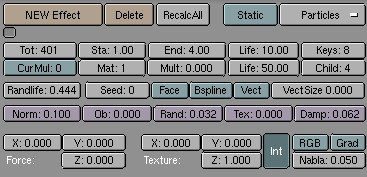
Now go to the AnimationButtons F7 and add a new particle effect to the plane. The numbers given here (Figure 11) should make for a realistic fire, but some modification may be necessary, depending on the actual emitter's size.
Some notes:
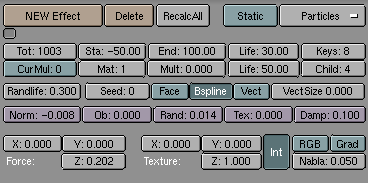
To have the fire burning from the start of the animation make Sta: negative. For example, try -50. The value of End: should reflect the desired animation length.
The Life: of the particles is 30. Actually it can stay at 50 for now. We will use this parameter later to adjust the height of the flames.
Make the Norm: parameter a bit negative (-0.008) as this will result in a fire that has a bigger volume at its basis.
Use a Force: Z: of about 0.200. If your fire looks too slow, this is the parameter to adjust.
Change Damp: to 0.100 to slow down the flames after a while.
Activate the "Bspline"-button. This will use an interpolation method which gives a much more fluid movement.
To add some randomness to our particles, adjust the Rand: parameter to about 0.014. Use the Randlife: parameter to add randomness in the lifetime of the particles; a really high value here gives a lively flame.
Use about 600-1000 particles in total for the animation (Tot:).
In the 3DWindow, you will now get a first impression of how realistically the flames move. But the most important thing for our fire will be the material.
The fire-material
With the particle emitter selected, go to the MaterialButtons F5 and add a new material. Make the new material a halo-material by activating the Halo button. Also, activate HaloTex, located just below this button. This allows us to use a texture later.

Give the material a fully saturated red color with the RGB-sliders. Decrease the Alpha value to 0.700; this will make the flames a little bit transparent. Increase the Add slider up to 0.700, so the Halos will boost each other, giving us a bright interior to the flames, and a darker exterior. (Figure 12).

If you now do a test render, you will only see a bright red flame. To add a touch more realism, we need a texture. While the emitter is still selected, go to the TextureButtons F6. Add a new Texture and select the Cloud-type. Adjust the "NoiseSize:" to 0.600. (Figure 13).
Go back to the MaterialButtons F5 and make the texture-color a yellow color with the RGB sliders on the right side of the material buttons. To stretch the yellow spots from the cloud texture decrease the "SizeY" value down to 0.30.
A test rendering will now display a nice fire. But we still need to make the particles fade out at the top of the fire. We can achieve this with a material animation of the Alpha and the Halo Size.
An animation for a particle material is always mapped from the first 100 frames of the animation to the lifetime of a particle. This means that when we fade out a material in frame 1 to 100, a particle with a lifetime of 50 will fade out in that time.
Be sure that your animation is at frame 1 (SHIFT-LEFTARrOW) and
move the mouse over the MaterialWindow. Now press IKEY and
choose Alpha from the appearing menu. Advance the frame-slider to
frame 100, set the Alpha to 0.0 and insert another key for the
Alpha with IKEY. Switch one Window to an IPOWindow. Activate
the MaterialIPOs by clicking on the sphere-icon in the IPOHeader (
 ). You
will see one curve for the Alpha-channel of the Material (Figure 14).
). You
will see one curve for the Alpha-channel of the Material (Figure 14).

Now you can render an animation. Maybe you will have to fine-tune some parameters like the life-time of the particles. You can add a great deal of realism to the scene by animating the lights (or use shadow-spotlights) and adding a sparks particle-system to the fire. Also recommended is to animate the emitter in order to get more lively flames, or use more than one emitter (Figure 15).
A simple explosion
This explosion is designed to be used as an animated texture, for composing it with the actual scene or for using it as animated texture. For a still rendering, or a slow motion of an explosion, we may need to do a little more work in order to make it look really good. But bear in mind, that our explosion will only be seen for half a second (Figure 16).

As emitter for the explosion I have chosen an IcoSphere. To make the explosion slightly irregular, I deleted patterns of vertices with the circle select function in EditMode. For a specific scene it might be better to use an object as the emitter, which is shaped differently, for example like the actual object you want to blow up.
My explosion is composed from two particle systems, one for the cloud of hot gases and one for the sparks. I took a rotated version of the emitter for generating the sparks. Additionally, I animated the rotation of the emitters while the particles were being generated.
The materials
The particles for the explosion are very straightforward halo materials, with a cloud texture applied to add randomness, the sparks too have a very similar material, see Figure 17 to Figure 19.


Animate the Alpha-value of the Haloparticles from 1.0 to 0.0 at the first 100 frames. This will be mapped to the life-time of the particles, as is usual. Notice the setting of Star in the sparks material (Figure 18). This shapes the sparks a little bit. We could have also used a special texture to achieve this, however, in this case using the "Star" setting is the easiest option.
The particle-systems
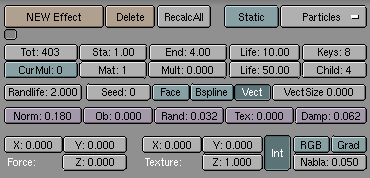
As you can see in (Figure 20) and (Figure 21), the parameters are basically the same. The difference is the Vect setting for the sparks, and the higher setting of Norm: which causes a higher speed for the sparks. I also set the Randlife: for the sparks to 2.000 resulting in an irregular shape.
I suggest that you start experimenting, using these parameters to begin with. The actual settings are dependent on what you want to achieve. Try adding more emitters for debris, smoke, etc.
Fireworks
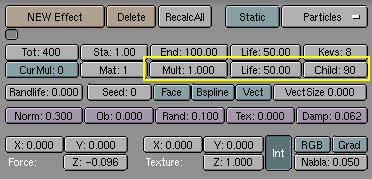
A button we have not used so far is the Mul: button, located with the particle buttons. The whole third line of buttons is related to this. Prepare a plane and add a particle system to the plane.
Adjust the parameters so that you get some particles flying into the sky, then increase the value of Mult: to 1.0. This will cause 100% of the particles to generate child particles when their life ends. Right now, every particle will generate four children. So we'll need to increase the Child: value to about 90 (Figure 22). You should now see a convincing firework made from particles, when you preview the animation with ALT-A.
When you render the firework it will not look very impressive. This is because of the standard halo material that Blender assigns. Consequently, the next step is to assign a better material.
Ensure that you have the emitter selected and go to the MaterialButtons F5. Add a new material with the MenuButton, and set the type to Halo.
I have used a pretty straightforward halo material; you can see the parameters in Figure 23. The rendered animation will now look much better, yet there is still something we can do.
While the emitter is selected go to the EditButtons F9 and add a new material index by clicking on the New button (Figure 24).
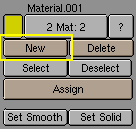
Now switch back to the MaterialButtons. You will see that the material data browse in the header has changed color to blue. The button labelled "2" indicates that this material is used by two users. Now click on the "2" button and confirm the popup. Rename the Material to "Material 2" and change the color of the halo and the lines (Figure 25).
Switch to the particle parameters and change the Mat: button to "2". Render again and you see that the first generation of particles is now using the first material and the second generation the second material! This way you can have up to 16 (that's the maximum number of material indices) materials for particles.
| Further enhancements |
|---|---|
Beside changing materials you also can use the material IPOs to animate material settings of each different material. |
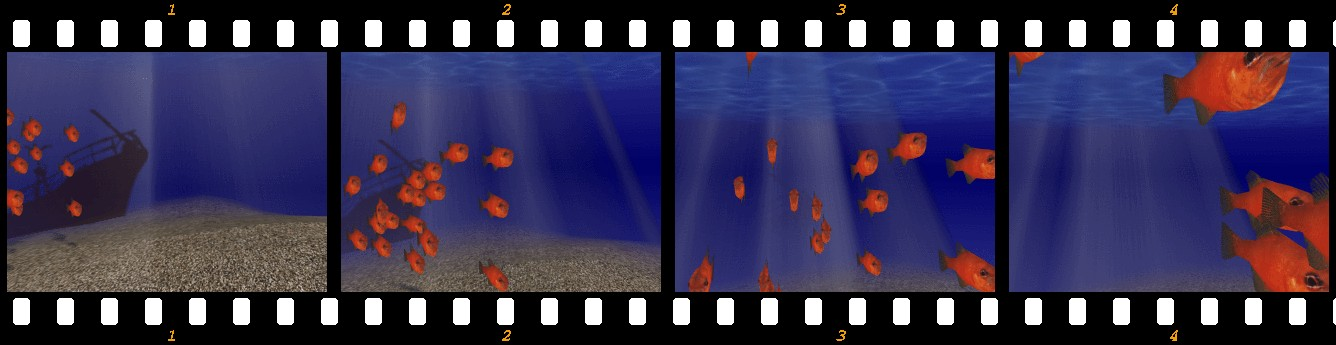
A shoal of fish
Now, we will create a particle system that emits real objects. This kind of particle system can be used to make shrapnel for explosions, or animate groups of animals. We will use the fish from the UV-Texturing tutorial, to create a shoal of fish that can be used to add some life and motion to underwater scenes.
The emitter
Switch to layer three (3KEY) to hide the layers with the environment, and add a plane in the sideview window at the 3D-cursor location. Without leaving EditMode, subdivide the plane two times and then leave EditMode.
Go to the AnimationButtons F7 and add a particle effect to the plane.
Set up your emitter as shown in the picture. I used 30 as total number of particles, and I stopped the generation at frame 30. This is so that every second a new particle is generated. A small amount of randomness should be used. The lifetime of the particles should be long enough to make sure that the particles don't vanish in front of the camera. Activate the Bspline and Vect options; these become important later (Figure 26).
Now we have to recover the fish from the UV-Texture tutorial. Press SHIFT-F1 to append the fish from its file. It will appear textured in the camera view if you have set it to textured mode (ALT-Z). If it is too big, scale it down and then move it out of the camera view.
Select the fish and extend your selection to the particle emitter. Press CTRL-P to make the emitter the parent of the fish. Now select only the emitter and go to the AnimButtons (F7) and switch on Dupliverts. Instances of the fish will appear at the position of every single particle. In case the fish is oriented wrong, select the base object and do a clear rotation with Alt-R. Now you can play back the animation in the camera view to see how the fish are moving. Experiment a bit with the particle setting until you get a realistic looking shoal of fish.
Using a Lattice to control the particles
Create a Lattice with the Toolbox. Scale it so that it just covers the shoal of fish. Switch to the EditButtons (F9)and set the "U:" resolution of the lattice to something approaching 10 (Figure 27). Then select the emitter, extend your selection with the Lattice, and make it the parent of the emitter. You can now deform the Lattice and the particle system will follow. After you have changed something, leave EditMode and do a "Recalc All" for the particle system. This will update them.
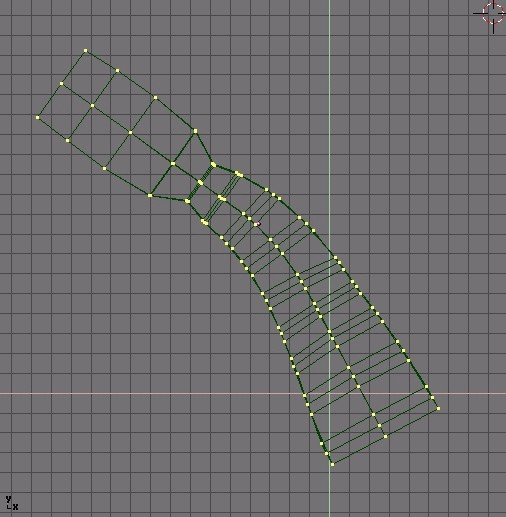
With the Lattice you can make curved paths for the fish, or make the shoal extend and join by scaling certain areas of the lattice. (Figure 28).