Path Animation
A different way to have Objects move in the space is to constrain them to follow a given path.
When objects need to follow a path, or it is too hard to animate a special kind of movement with the keyframe method (Think of a planet following its way around the Sun. Animating that with keyframes is virtually impossible) curve objects can be used for the 3D display of an animation path.
If the Curve object contains more than a single continuous curve only the first curve in the object is then used.
Any kind of curve can become a path by setting the option CurvePath Toggle Button in the Animation Buttons window (F7) to ON (Figure 7).
When a Curve is turned to a Path all Child objects of the Curve move along the specified path. It is a good idea to set the Curve to 3D via the 3D Toggle Button of the Curve Edit Buttons so that the paths can be freely modelled.
Otherwise, in the ADD menu under Curve->Path, there is a primitive with the correct settings already there. This is a 5th order Nurbs spline, which can be used to create very fluid, continuous movements.
Normally a Path is 100 frames long and it is followed in 100 frames by children. You can make it longer or shorter by varying the PathLength: Num Button.
The speed along a path is determined with an appropriate curve in the IpoWindow. To see it, the IPO Window Header button with the 'arrow' icon must be pressed in. The complete path runs in the IpoWindow between the vertical values 0.0 and 1.0. Drawing a curve between these values links the time to the position on the path. Backward and pulsing movements are possible with this. For most paths, an IpoCurve must run exactly between the Y-values 0.0 and 1.0. To achieve this, use the Number menu (NKEY) in the IpoWindow. If the IpoCurve is deleted, the value of AnimButtons->PathLen determines the duration of the path. A linear movement is defined in this case.
The Speed IPO is a finer way of controlling Path length. The path is long 1 for time IPO, and if the time IPO goes from 0 to 1 in 200 frames then the path is 200 frames long.
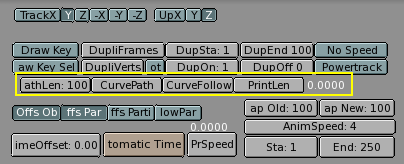
Using the option CurveFollow, a rotation is also given to the Child objects of the path, so that they permanently point in the direction of the path. Use the "tracking" buttons in the AnimButtons to specify the effect of the rotation (Figure 8):

TrackX, Y, Z, -X, -Y, -Z This specifies the direction axis, i.e. the axis that is placed on the path.
UpX, UpY, UpZ (RowBut) Specifies which axis must point 'upwards', in the direction of the (local) positive Z axis. If the Track and the Up axis coincides, it is deactivated.
Curve paths cannot be given uniform rotations that are perpendicular to the local Z axis. That would make it impossible to determine the 'up' axis.
To visualize these rotations precisely, we must make it possible for a Child to have its own rotations. Erase the Child's rotation with ALT-R. Also erase the "Parent Inverse": ALT-P. The best method is to 'parent' an unrotated Child to the path with the command SHIFT-CTRL-PKEY: "Make parent without inverse". Now the Child jumps directly to the path and the Child points in the right direction.
3D paths also get an extra value for each vertex: the 'tilt'. This can be used to specify an axis rotation. Use TKEY in EditMode to change the tilt of selected vertices in EditMode, e.g. to have a Child move around as if it were on a roller coaster.