The IPO Curves
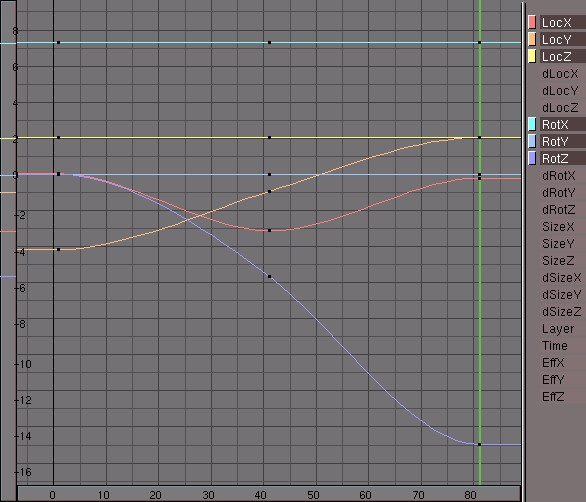
Now we want to see exactly what happened. The first Screen for this is initialised in the standard Blender start-up file. Activate this Screen with CTRL.LEFTARROW. At the right we see the IPOWindow displayed (Figure 2). You can of course turn any window into an IPO window with the pertinent Window Type menu entry, but it is more handy to have both a 3D window and an IPO window at the same time. This shows all the IPOCurves, the channels used and those available. You can zoom in on the IPOWindow and translate, just as everywhere else in Blender with (CTRL-MMB).
In addition to the standard channels, you have the delta options, such as dLocX. These channels allow you to assign a relative change. This option is primarily used to control multiple objects with the same IPO. In addition, it is possible to work in animation 'layers'. You can achieve subtle effects this way without having to draw complicated curves.
Each curve can be selected individually with the RMB. In addition, the Grabber and Size modes operate here just as in the 3DWindow. By selecting all curves (AKEY) and moving them to the right (GKEY), you can move the complete animation in time.
Each curve can be placed in EditMode individually, or it can be done collectively. Select the curves and press TAB. Now the individual vertices and handles of the curve are displayed. The Bezier handles are coded, just like the curve object:
Free Handle (black). This can be used any way you wish. Hotkey: HKEY (switches between Free and Aligned).
Aligned Handle (pink). This arranges all the handles in a straight line. Hotkey: HKEY (toggles between Free and Aligned).
Vector Handle (green). Both parts of a handle always point to the previous or next handle. Hotkey: VKEY.
Auto Handle (yellow). This handle has a completely automatic length and direction. Hotkey: SHIFT-HKEY.
Handles can be moved by first selecting the middle vertex with RMB. This selects the other two vertices as well. Then immediately start the Grab mode with RMB-hold and move. Handles can be rotated by first selecting the end of one of the vertices and then use the Grabber by means of the RMB-hold and move action.
As soon as handles are rotated, the type is changed automatically:
Auto Handle becomes Aligned.
Vector Handle becomes Free.
"Auto" handles are placed in a curve by default. The first and last Auto handles always move horizontally, which creates a fluid interpolation.
The IPOCurves have an important feature that distinguishes them from normal curves: it is impossible to place more than one curve segment horizontally. Loops and circles in an IPO are senseless and ambiguous. An IPO can only have 1 value at a time. This is automatically detected in the IPOWindow. By moving part of the IPOCurve horizontally, you see that the selected vertices move 'through' the curve. This allows you to duplicate parts of a curve (SHIFT-D) and to move them to another time frame.
It is also important to specify how an IPOCurve must be read outside of the curve itself. There are four options for this in the IPOHeader (Figure 3).

Thre effect of each of these can be appreciated in (Figure 4).
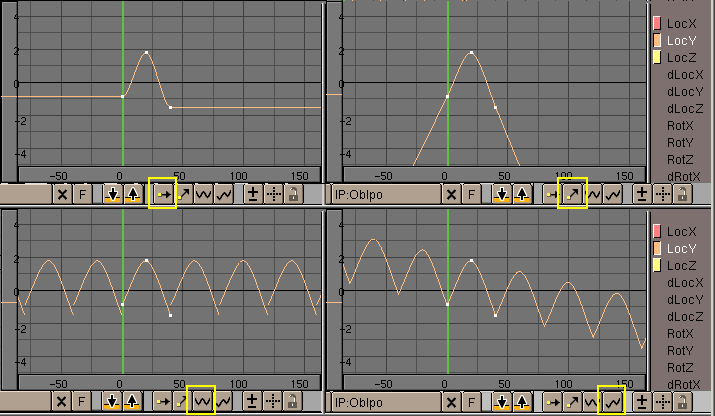
From left to right:
Extend mode Constant: The ends of selected IPOCurves are continuously (horizontally) extrapolated. It is the default behaviour.
Extend mode Direction: The ends of the selected IPOCurves continue in the direction in which they ended.
Extend mode Cyclic: The complete width of the IPOCurve is repeated cyclically.
Extend Mode Cyclic Extrapolation: The complete width of the IPOCurve is extrapolated cyclic.
In addition to Beziers, there are two other possible types for IPOCurves. Use the TKEY command to select them. A Pop-up menu asks what type the selected IPOCurves must be:
Constant - after each vertex of the curve, this value remains constant. No interpolation takes place.
Linear - linear interpolation occurs between the vertices.
Bezier - the standard fluid interpolation.
The IPO curves need not be set only by Key Framing. They can also be drawn 'by hand'. Use the CTRL-LMB command. Here are the rules:
There is no IPO block yet (in this window) and one channel is selected: a new IPOBlock is created along with the first IPOCurve with one vertex placed where the mouse was clicked.
There is already an IPO block, and a channel is selected without an IPOCurve: a new IPOCurve with one vertex is added.
There is already an IPO block, and a channel is selected withh an existing IPOCurve: A new point is added to the selected IPOCurve.
This is not possible if multiple IPOCurves are selected or in EditMode.
 | Make an object rotate |
|---|---|
This is the best method for specifying axis rotations quickly. Select the object. In the IPOWindow, press one of the "Rot" channels and use CTRL+LMB to insert two points. If the axis rotation must be continuous, you must use the button IPOHeader->"Extend mode Directional". |
One disadvantage of working with motion curves is that the freedom of transformations is limited. You can work quite intuitively with motion curves, but only if this can be processed on an XYZ basis. For a location, this is outstanding, but for a size and rotation there are better mathematical descriptions available: matrices (3x3 numbers) for size and quaternions (4 numbers) for rotation. These could also have been processed in the channels, but this can quite easily lead to confusing and mathematically complicated situations.
Limiting the size to the three numbers XYZ is obvious, but this limits it to a rectangular distortion. A diagonal scaling such as 'shearing' is impossible. Simply working in hierarchies can solve this. A non-uniform scaled Parent will influence the rotation of a Child as a 'shear'.
The limitation of the three number XYZ rotations is less intuitive. This so-called Euler rotation is not uniform - the same rotation can be expressed with different numbers - and has the bothersome effect that it is not possible to rotate from any position to another, the infamous gimbal lock. While working with different rotation keys, the user may suddenly be confronted with quite unexpected interpolations, or it may turn out to be impossible to force a particular axis rotation when making manual changes. Here, also, a better solution is to work with a hierarchy. A Parent will always assign the specified axis rotation to the Child. (It is handy to know that the X, Y and Z rotations are calculated one after the other. The curve that affects the RotX channel, always determines the X axis rotation).
Luckily, Blender calculates everything internally with matrices and quaternions. Hierarchies thus work normally, and the Rotate mode does what you would expect it to. Only the IPOs are a limitation here, but in this case the ease of use prevails above a not very intuitive mathematical purity.