Specular Reflection
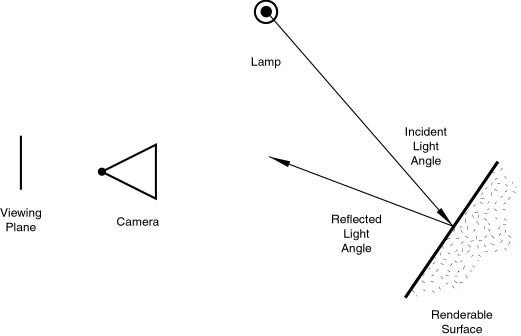
Specular reflection, on the other hand, is viewpoint dependent. Light striking a specular surface, by Snell's Law, will be reflected at an angle which mirrors the incident light angle, so the viewing angle is very important. Specular reflection forms tight, bright highlights, making the surface appear glossy (Figure 3).
In reality, Diffusion and Specular reflection are exactly the same process. Diffusion is seen on a surface which has so much small-scale roughness, with respect to wavelength, in the surface that light is reflected in many different directions from each tiny bit of the surface with tiny changes in surface angle.
Specular reflection appears on a surface with enough consistency in the angle of the surface that the light is reflected in a consistent direction, rather than being scattered. It's just a matter of the scale of the detail. If the surface roughness is much smaller than the wavelength of the incident light it appears flat and acts as a mirror.
It is not only a matter of wavelength but also a matter of the dimension of the object on the rendered image and, in particular, on the dimension of the rendered object with respect to the image pixel. An automobile's chrome fender normally looks shiny, but from a spacecraft it will appear as part of the diffuse detail of the planet. Likewise, sand has a matte appearance, but if you look at it through a microscope you will see smooth, shiny surfaces.
It is important to stress that the Specular reflection phenomenon treated here is not the reflection which occurs on a mirror, but rather light highlights on a glossy surface.
To obtain true mirror-like reflections you need a raytracer. Blender is not a raytracer as such, but it can produce convincing mirror-like surfaces via careful application of textures, as will be shown later on.
Similar to Diffusion, Specular reflection has a number of different implementations, or specular shaders. Again, each of these share two common parameters: the Specular colour and the energy of the specularity, in the [0-2] range - thus effectivelly allowing more energy to be shed as specular reflection as there is incident energy. It is important to note here that a material has therefore at least two different colours, a diffuse, and a specular one, the latter normally set to pure white, but which can be set to different values to obtain interesting effects.
The four specular shaders are:
CookTorr - This was Blender's only Specular Shader up to version 2.27. Indeed, up to that version it was not possible to separately set diffuse and specular shaders and there was just one plain material implementation. Besides the two standard parameters it uses a third, hardness, which regulates how 'wide' the specular highlights are. The lower the hardness, the wider the highlights.
Phong - A different mathematical algorithm to compute specular highlights, not very different from the previous, and governed by the same three parameters.
Blinn - A more 'physical' specular shader, thought to match the Oren-Nayar diffuse one. It is more physical inasmuch as, besides the aforementioned three parameters, it adds a fourth, an index of refraction (IOR). This is not actually used to compute refraction of rays, a ray-tracer is needed for that, but to correctly compute specular reflection intensity and extension via Snell's Law. Hardness and Specular parameters give additional degrees of freedom.
Toon - This specular shader matches the Toon diffuse one. It is designed to produce the sharp, uniform highlights of toons. It has no hardness but rather a Size and Smooth pair of parameters which dictates extension and sharpness of the specular highlights.
Thanks to this flexible implementation Blender allows us to easily control how much of the incident light striking a point on a surface is diffusely scattered, how much of it is reflected as specularity, and how much of it is not reflected at all. This determines in what directions (and in what amounts) the light is reflected from a given light source or, to look at it another way, from what sources (and in what amounts) the light is being reflected toward a given point on the viewing plane.
It is very important to remember that the material colour is just one element in the rendering process. What actually determines the colour seen in the rendered image also depends on the colour of the light illuminating the object. To put it simply, the colour is the product of the light colour and the material colour.