Rotating objects
To rotate objects, activate Rotate mode by pressing RKEY. As in Grab mode, you can now change the rotation by moving the mouse, confirm with LMB or ENTER and cancel with RMB or ESC.
Rotation in 3D space occurs around an axis, and there are various ways to define this axis. Blender defines an axis via its direction and a point that it passes through. By default, the direction of the axis is orthogonal to your screen. If you are viewing the scene precisely from the front, side or top, the rotation axis will be parallel to one of the global coordinate system axes. If you are viewing from an angle, the rotation axis is angled too, which can easily lead to a very odd rotation of your object. In this case, you may want to keep the rotation axis parallel to the coordinate system axes. Toggle this behaviour by pressing MMB during Rotate mode and watch the angle display in the window header.
Alternatively, once you are in rotate mode, you can press XKEY YKEY or ZKEY to constrain rotation along that axis.
The point that the rotation axis should pass through can be selected with four buttons in the header of the 3D window (Figure 1).
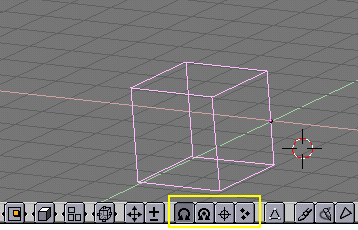
If the first button is pushed, the axis passes through the center of the selection's bounding box. (If only one object is selected, the point used is the center point of the object, which must not necessarily be in the geometric center: in Figure 1 it is on the middle of the rightmost edge, marked by a purple dot. For more on this point, see the Section called EditMode in the chapter called Mesh Modelling.)
If the second button is pushed, the axis passes through the median point of the selection. This difference is actually relevant only in EditMode and the 'Median' point is the barycentrum of all vertices.
If the third button is pushed, the axis passes through the 3D cursor. The cursor can be placed anywhere you wish before rotating. Using this tool you can easily perform certain translations in the same working step as the rotation.
If the fourth button is pushed, each selected object receives its own rotation axis; they are all parallel and pass through the center point of each object, respectively. If you select only one object, you will obviously get the same effect as with the first button.
All these details are very theoretical and not necessary if you are getting started; just play around with Blender's tools and you'll get a feeling for it.
Keeping CTRL pressed switch snap mode in this case too. In snap mode rotations are constrained to 5° steps. Keeping SHIFT pressed allows fine tuning here too.
An alternative way to enter Rotate mode is to draw a circular line while holding down LMB. The rotation of selected objects can be reset to the default value by pressing ALT-R.