Material Buttons

The settings in this ButtonsWindow visualise the Material DataBlock. The MaterialButtons are only displayed if the active Object has a Material. Hotkey: F5.

The DataButtons in the Header indicate what Material block is visualised.
Users
If the Material block is used by more than one Object, this button indicates the total number of users. Press the button to make the Material "Single User". An exact copy is created.
Copy to buffer
The complete contents of the Material and all the mapping is copied to a temporary buffer.

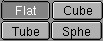
Sphere
In the sphere-preview the Z axis is the vertical axis for the preview sphere; the X and Y axes revolve around this axis.
Cube
The cubic preview shows the material preview mapped on three sides of a cube, allowing to see the three possible mappings.
Refresh
Use this button to refresh the material-preview. This is mostly needed after changing frames while having a material-Ipo.

These buttons specify what the Material block is linked to, or must be linked to. By linking Materials directly to Objects, each Object is rendered in its own Material.
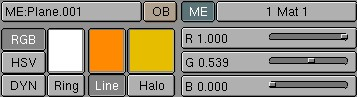
ME:
This Button indicates the block to which the Material is linked. This button can only be used to give the block another name. Possible blocks are:
ME: Material is linked to a Mesh (ObData) block.
CU: Material is linked to a Curve, Surface or Font (ObData) block.
MB: Material is linked to a MetaBall (ObData) block.
OB: Material is linked to the Object itself.
OB
Use this button to link the current Material to the Object. Any link to the ObData block remains in effect. Links can be removed with the Header button:
"Remove Link" ME or CU or MB
Use this button to link the current Material to the ObData of the Object. Any link to the Object block remains in effect. Links can be removed with the Header button: "Remove Link"

1 Mat 1
An Object or ObData block may have more than one Material. This button can be used to specify which of the Materials must be displayed, i.e. which Material is active. The first digit indicates how many Materials there are; the second digit indicates the number of the active Material. Each face in a Mesh has a corresponding number: the 'Material index'. The number of indices can be specified with the EditButtons. Curves and Surfaces also have Material indices.

RGB
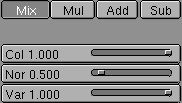
Most colour sliders in Blender have two pre-set options: in this case, the colour is created by mixing Red, Green, Blue.
HSV
The colour sliders mix colour with the Hue, Saturation, Value system. 'Hue' determines the colour, 'Saturation' determines the amount of colour in relation to grey and 'Value' determines the light intensity of the colour.
DYN
Adjust parameters for the dynamics optons. The following buttons specify what type of color is visualised in the sliders:
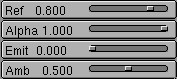
Ref
Reflectivity. The degree to which the Material reflects the basic colour when light falls on it.
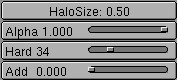
Alpha
The degree of coverage, which can be used to make Materials transparent. Use the option "ZTransp" to specify that multiple transparent layers can exist. Without this option, only the Material itself is rendered, no matter what faces lie behind it. The transparent information is saved in an alphalayer, which can be saved as part of a picture (see DisplayButtons).
Ambient
The degree to which the global Ambient colour is applied, a simple form of environmental light. The global Ambient can be specified in the World block, using the WorldButtons. Ambient is useful for giving the total rendering a softer, more coloured atmosphere.
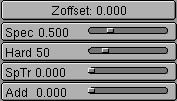
Zoffset
This button allows you to give the face to be rendered an artificial forward offset in Blender's Zbuffer system. This only applies to Materials with the option "ZTransp". This option is used to place cartoon figures on a 3D floor as images with alpha. To prevent the figures from 'floating', the feet and the shadows drawn must be placed partially beneath the floor. The Zoffset option then ensures that the entire figure is displayed. This system offers numerous other applications for giving (flat) images of spatial objects the appropriate 3D placement.
Hard
The hardness of the specularity. A large value gives a hard, concentrated sheen, like that of a billiard ball. A low value gives a metallic sheen.
SpTr
This button makes areas of the Material with a sheen opaque. It can be used to give transparent Materials a 'glass' effect.
Add
This option adds some kind of glow to transparent objects, but only works with the unified renderer.

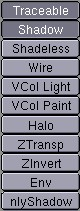
Traceable
This term stems from Blender's ray-trace past. It specifies whether or not shadow lamps can 'see' the current Material. Turn the "Traceble" option OFF to prevent undesired shadows.
Shadow
This button determines whether the Material can receive a shadow, i.e. whether a shadow calculation is needed.
Wire
Only the edges of faces are rendered (normal rendering!). This results in an exterior that resembles a wire frame. This option can only be used for Meshes.
VCol Light
If the Mesh vertex has colours (see EditButtons), they are added to the Material as extra light. The colours also remain visible without lamps. Use this option to render radiosity-like models.
VCol Paint
If the Mesh vertex has colours, this button replaces the basic colour of the Material with these colours. Now light must shine on the Material before you can see it. < point>Halo (TogBut) Instead of rendering the faces, each vertex is rendered as a halo. The lensflare effect is a part of the halo. This option change certain MaterialButtons (see the following section).
ZTransp
Transitional Zbuffers can only render opaque faces. Blender uses a modified method to Zbuffer transparent faces. This method requires more memory and calculation time than the normal Zbuffer, which is why the two systems are used alongside each other.
Env
Environment option. The Material is not rendered and the Zbuffer and render buffers are 'erased' so that the pixel is delivered with Alpha = 0.0.
OnlyShadow
This option determines the alpha for transparent Materials based on the degree of shadow. Without a shadow the Material is not visible.

Texture name
A Material has eight channels to which Textures can be linked. Each channel has its own mapping, which is the effect the texture has on the material.

SepT
Separate Textures. This option forces only the current channel to be rendered with its corresponding Texture.

Mapping: coordinates as input.
Each Texture has a 3D coordinate (the texture coordinate) as input. The starting point is generally the global coordinate of the 3D point that can be seen in the pixel to be rendered. A Material has the following Mapping options:
UV
The U-V coordinates of a face or Nurbs surface from an Object make up the texture coordinates. U-V is a commonly used term for specifying the mathematical space of a flat or curved surface.
Object
Every Object in Blender can be used as a source for texture coordinates. For this, the Object's inverse transformation is applied to the global coordinate, which gives the local Object coordinate. This links the texture to the position, dimension and rotation of the Object. Generally, an Empty Object is used to specify the exact location of a Texture, e.g. to place a logo on the body of an airplane. Another commonly used approach is to have the 'Texture Object' move to achieve an animated texture.
Object Name
The name of the Object used for the texture coordinates. If the Object does not exist, the button remains empty.
Stick
Sticky texture. Blender allows you to assign a texture coordinate to Meshes, which is derived from the manner in which the Camera view sees the Mesh. The screen coordinate (only X,Y) for each vertex is calculated and saved in the Mesh. This makes it appear as if the texture is projected from the Camera; the texture becomes "sticky" (see also "Make Sticky" in the EditButtons). Use "Sticky" to precisely match a 3D object with an Image Texture. Special morphing effects can also be achieved.
Win
The screen coordinate (X,Y) is used as a texture coordinate. Use this method to achieve 2D layering of different Images.
Nor
The normal vector of the rendered face is used as a texture coordinate. Use this method to achieve reflectionmapping, which is the suggestion of mirroring using a specially pre-calculated Image.
Refl
The reflection vector of the rendered face is used as a texture coordinate. This vector points in a direction that makes the face appear to be mirrored. Use this option to suggest a reflected surface with procedural textures such as "Marble" or "Clouds" and of course for the use with the EnvMap texture.
dX, dY, dZ
The extra translation of the texture coordinate. sizeX, sizeY, sizeZ (NumBut) The extra scaling of the texture coordinate.
Mapping: 3D to 2D
For Image Textures only; this determines the manner is which the 3D coordinate is converted to 2D.
Cube
Depending on the normal vector of the face, the X-Y or the X-Z or the Y-Z coordinates are selected. This option works well for stones, marbles and other regular textures,
Tube
This creates a tube-shaped mapping. The Z axis becomes the central axis, X and Y revolve around it.
Sphere
This causes a sphere-shaped mapping. The Z axis becomes the central axis, X and Y revolve around it.
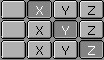
Mapping: switch coordinates.
The three rows of buttons indicate the new X, Y and Z coordinates. Normally, the X is mapped to X, the Y to Y and Z to Z. The first button switches a coordinate completely off.
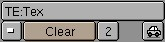
TE:
The name of the Texture block. The name can be changed with this button. Texture Browse (MenuBut) Select an existing Texture from the list provided, or create a new Texture Block.
Users
If the Texture Block has multiple users, this button displays the total number of users. Press the button to make the Texture "Single User". An exact copy is made.
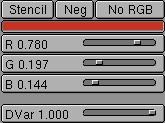
Stencil
Normally, textures are executed one after the other and laid over one another. A second Texture channel can completely replace the first. With this option, the mapping goes into stencil mode. No subsequent Texture can have an effect on the area the current Texture affects.
RGBtoInt
With this option, an RGB texture (affects colour) is used as an Intensity texture (affects a value).
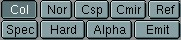
Nor
The texture affects the rendered normal. Only important for Image textures. The "Stucci" texture does this itself.
Ref
The texture affects the value of the material's reflectivity. There are three settings; the third setting reverses the effect
The MaterialButtons, Halos

If a Material has the option "Halo" ON, a number of buttons change to specific halo settings. Lensflares can also be created here. Halos are rendered on the 3D location of the vertices. These are small, transparent round spots or pictures over which circles and lines can be drawn. They take Blender's Zbuffer into account; like any 3D element, they can simply disappear behind a face in the forefront.
Halos are placed over the currently rendered background as a separate layer, or they give information to the alphalayer, allowing halos to be processed as a post-process.
Only Meshes and Particle Effects can have halos. A Mesh with a halo is displayed differently in the 3DWindow; with small dots at the position of the vertices. Halos cannot be combined with 'ordinary' faces within one Mesh. Only one Material can be used per 'halo' Mesh.

Flare
Each halo is now also rendered as a lensflare. This effect suggests the reflections that occur in a camera lens if a strong light source shines on it. A Flare consists of three layers:
the ordinary halo, which has a 3D location, and can thus disappear behind a face.
the basic Flare, which is the same halo, but possibly with other dimensions. This is placed over the entire rendering as a post-process.
the sub Flares, multi-coloured dots and circles, that are also placed over the entire rendering as a post-process.
The "HaloSize" value not only determines the dimensions, but is also used to determine the visibility - and thus the strength - of the Flare rendered in the post-process. This way, a Flare that disappears slowly behind a face will decrease in size at a corresponding speed and gradually go out.
Star
Instead of being rendered as a circle, the basic halo is rendered in the shape of a star. The NumBut "Star" determines the number of points the star has.
HaloTex
Halos can be given textures in two ways:
"HaloTex" OFF: the basic colour of each halo is determined by the texture coordinate of the halo-vertex.
"HaloTex" ON: each halo gets a complete texture area, in which, for example, an Image texture is displayed completely in each basic halo rendered.
HaloPuno
The vertex normal ("Puno" in Blender's turbo language) is used to help specify the dimension of the halo. Normals that point directly at the Camera are the largest; halos with a normal that point to the rear are not rendered. If there are no vertex normals in the Mesh (the Mesh only consists of vertices) the normalised local coordinate of the vertex is used as the normal.
XAlpha
Extreme Alpha. Halos can 'emit light'; they can add colour. This cannot be expressed with a normal alpha. Use this option to force a stronger progression in the alpha.
Add
Normally, the colour of halos is calculated during rendering, giving a light emitting effect. Set the "Add" value to 0.0 to switch this off and make black or 'solid' halos possible as well.
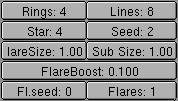
Seed
'Random' values are selected for the dimension of the rings and the location of the lines based on a fixed table. "Seed" determines an offset in the table.