Sequence Editor
An often underestimated function of Blender is the Sequence Editor. It is a complete video editing system that allows you to combine multiple video channels and add effects to them. Even though it has a limited number of operations, you can use these to create powerful video edits (especially when you combine it with the animation power of Blender!) And, furthermore, it is extensible via a Plugin system quite alike the Texture plugins.
Learning the Sequence Editor
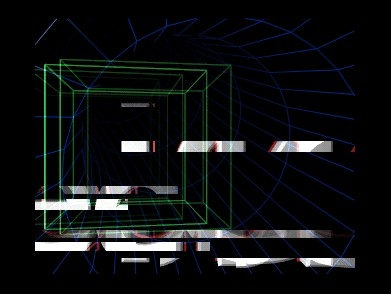
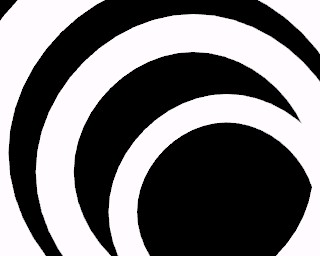
This section shows you a practical video editing example exhibiting most of the Sequence Editor built in features. We will put toghether several Blender made animations to obtain some stuning effects. One frame of the resulting edited animation is in Figure 1.
First animation: two cubes
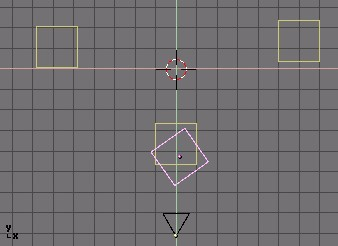
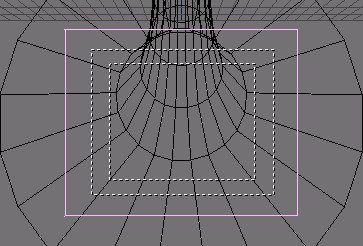
Let's start with something simple and see where it leads. Start a clean Blender and remove the default plane. Split the 3D window and switch one of the views to the camera view with NUM 0. In the top-view, add a cube and move it just outside of the dotted square that indicates the camera view. Figure 2.
 | TV limitations |
|---|---|
When you are planning to show your work on television, note the inner dotted square. Since not all televisions are the same, there is always a part of the picture that is 'cut off'. The inner square indicates which area is guaranteed to be viewable. The area between the dotted lines is referred to as the 'overscan area'. |

We want to create a simple animation of the cube where it moves into view, rotates once and then disappears. Set the animation end to 61 (set the End: value in the Render Buttons window - F10) and insert a LocRot keyframe on frame 1 with IKEY and selecting LocRot from the menu which appears. This will store both the location and the rotation of the cube on this frame.
Go to frame 21 (press ARROW_UP twice) and move the cube closer to the camera. Insert another keyframe. On Frame 41, keep the cube on the same location but rotate it 180 degrees and insert another keyframe.
Finally on frame 61 move the cube out of view, to the right and insert the last keyframe.
| Keyframe checking |
|---|---|
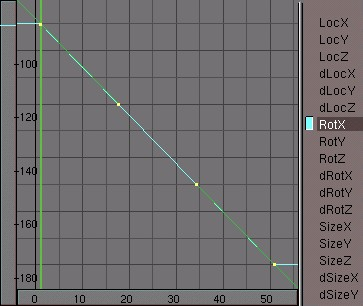
To check, select the cube and press KKEY to show all keyframes in the 3D window. If you want, you can easily make changes by selecting a keyframe with PAGEUP or PAGEDOWN (the active keyframe will be displayed as a brighter yellow color than the other keyframes) and moving or rotating the cube. With the keys displayed, you do not need to re-insert the keyframes - they are automatically updated (Figure 3). |
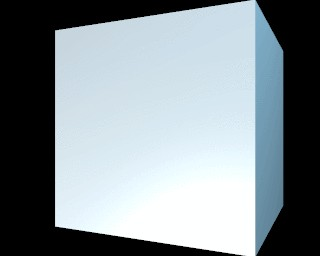
We will need two versions of the animation: one with a solid material and one with a wireframe. For the material, we can use a plain white lit by two bright lamps - a white one and a blue one with an energy value of two (Figure 4).
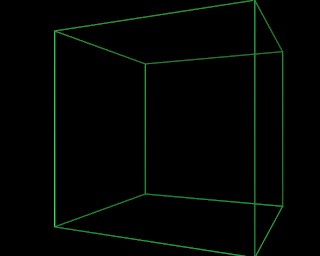
For the wireframe cube, set the material type to 'Wire' and change the color to green (Figure 5).
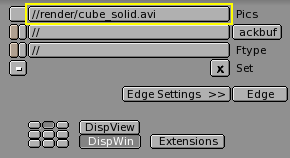
Enter an appropriate filename (for example 'cube_solid.avi') in the 'Pics' field of the Render Buttons window (F10) (Figure 6).
Render the animation with the white solid cube. This will save it to your disk. Save it as an AVI file. Use AVI Raw if possible, because it yelds an higher quality - compression should be the last thing in the editing process - otherwise, if short of disk space use AVI Jpeg or AVI Codec, the first being less compressed and hence often of higher quality.
Now change the material to the green wireframe, render the animation again and save the result as cube_wire.avi.
You now have a 'cube_solid.avi' and 'cube_wire.avi' on your hard disk. This is enought for our first sequence editing.
First Sequence: delayed wireframes
The first sequence will use only the wireframe animation - twice - to create an interesting effect. We will create multiple layers of video, give them a small time offset and add them together. This will simulate the 'glowing trail' effect that you see on radar screens.
Start a clean Blender file and change the 3D window to a Sequence
Editor window by pressing SHIFT F8 or by
selecting the Sequence Editor icon
 from the window header.
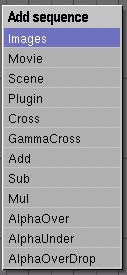
Add a movie to the window by pressing SHIFT-A and selecting 'Movie' (Figure 7). From the File Select window select the wireframe cube animation that you made before.
After you have selected and loaded the movie file, you see a blue strip that represents it. After adding a strip, you are automatically in grab mode. The start and end frame are now displayed in the bar.
Take a closer look at the Sequence Editor screen now. Horizontally you see the time value. Vertically, you see the video 'channels'. Each channel can contain an image, a movie or an effect. By layering different channels on top of each other and applying effects, you can mix different sources together. If you select a video strip, its type, length and filename will be printed at the bottom of the window.
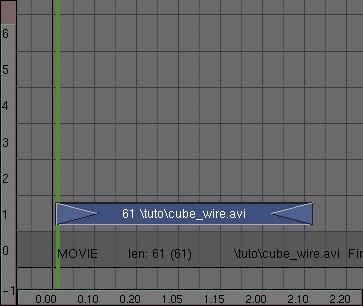
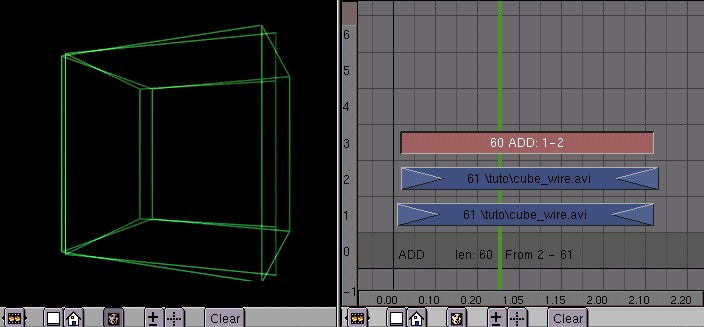
Grab your video strip and let it start at frame 1. Place it in channel 1, that is on the bottom row (Figure 8).
| Lead-in, Lead-out and stills |
|---|---|
You can add lead-in and lead-out frames by selecting the triangles at the start and end of the strip (they will turn purple) and dragging them out. In the same way, you can define the 'length' in frames of a still image. |
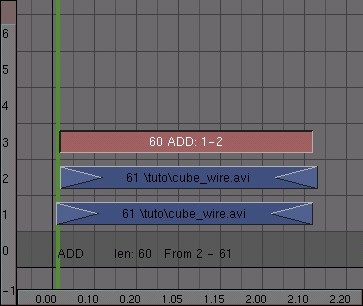
Duplicate the movie strip with SHIFT D, place the duplicate in channel 2 and shift it one frame to the right. We now have two layers of video on top of each other, but only one will display. To mix the two layers you need to apply an effect to them.
Select both layers and press SHIFT-A. Select ADD from the menu that pops up (Figure 9).
To see what's happening split the sequence editor window and select the image button in the header (Figure 10). This will activate the automatic preview (Figure 11). If you select a frame in the sequence editor window with the strips, the preview will be automatically updated (with all the effects applied!).

If you press ALT A in the preview window, Blender will play back the animation. (Rendering of effects for the first time takes a lot of processing time, so don't expect a real-time preview!).
| Windowless preview |
|---|---|
If you do not like the separate render window, switch to the Render Buttons (F10) and select DispView in the bottom left. |
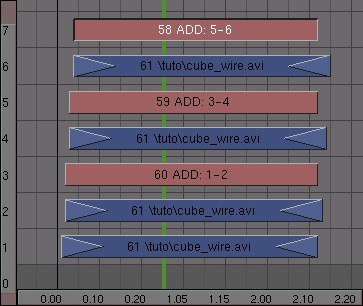
Now its time to add some more mayhem to this animation. Duplicate another movie layer and add it to the ADD effect in video channel 3. Repeat this once and you will have four wireframe cubes in the preview window (Figure 12).
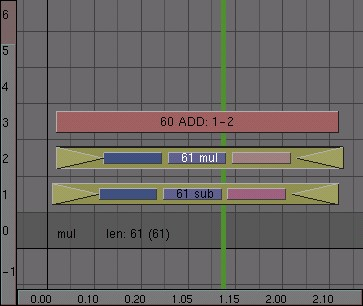
All the cubes have the same brightness now, but I would like to have a falloff in brightness. This is easily arranged: open an IPO window somewhere (F6) and select the sequence icon in its header (Figure 13).

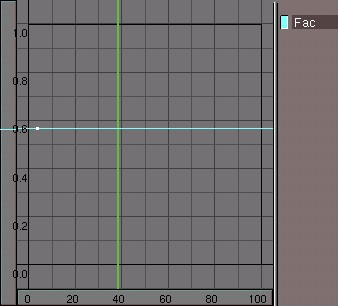
Select the first add strip (the one in channel 3), hold down CTRL and click LMB in the IPO window on a value of 1. This sets the brightness of this add operation to maximum. Repeat this for the other two add strips, but decrease the value a bit for each of them, say to around 0.6 and 0.3 (Figure 14).
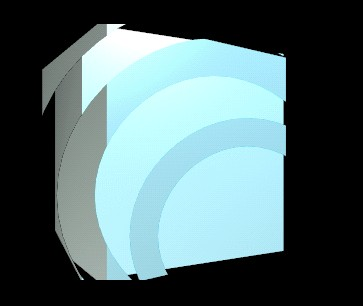
Depending on the ADD values that you have just set, your result should look something like what is shown in Figure 15.

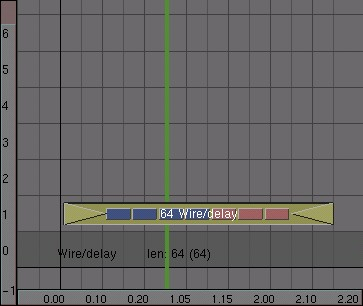
Now we already have 7 strips and we have only just begun with our animation! You can imagine that the screen can quickly become very crowded indeed. To make your project more manageable, select all strips (AKEY and BKEY work here, too!), press MKEY and press ENTER or click on the Make Meta pop up. The strips will now be combined into a meta-strip, and can be copied or moved as a whole.
With the meta strip selected, press N and enter a name, for example 'Wire/Delay', to better remember what it is Figure 16.
Second animation: A delayed solid cube
Now it is time to use some masks. We want to create two areas in which the animation plays back with 1 frame time difference. This creates a very interesting glass-like visual effect.
Start by creating a black and white image like this one. You can use a paint program or do it in Blender. The easiest way to do this in Blender is to create a white material with an emit value of 1 or a shadeless white material on some beveledCurve Circles(Figure 17). In this way, you do not need to set up any lamps. Save the image as mask.tga.
Switch to the sequence editor and move the meta strip that we made before out of the way (we will reposition it later). Add the animation of the solid cube (SHIFT+A, 'Movie'). Next, add the mask image. By default a still image will get a length of 50 frames in the sequence editor. Change it to match the length of the cube animation by dragging out the arrows on the side of the image strip with the right mouse button.
Now select both strips (hold down SHIFT), press SHIFT+A and add a SUB (subtract) effect. (Figure 18).
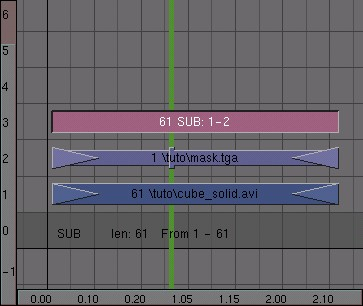
In the preview window you will now see the effect; the areas where the mask is white have been removed from the picture (Figure 19).
This effect is ready now; select all three strips and convert them into a META strip by pressing MKEY
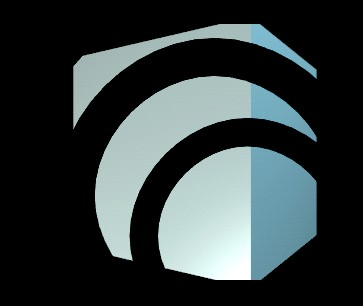
Now do the same, except that you don't use the SUB effect but the MUL (multiply) effect (Figure 20). This time you will only see the original image where the mask image is white. Turn the three strips of this effect into a meta strip again.
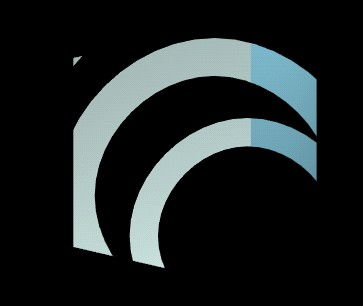
For the final step I have to combine the two effects together. Move one of the meta strips above the other one and give it a time offset of one frame. Select both strips and add an ADD effect (Figure 21).
In the preview window you can now see the result of the combination of the animation and the mask (Figure 22).
When you are ready, select the two meta strips and the ADD effect and convert them into a new meta strip. (That's right! You can have meta strips in meta strips!)
| Getting into a Meta Strip |
|---|---|
To edit the contents of a meta strip, select it and press TAB. The meta strip will 'explode' to show its components and background will turn yellow/greenish to indicate that you are working inside a meta strip. Press TAB again to return to normal editing. |
Third animation: a tunnel
We want a third 'effect'to further enrich our animation; a 3D 'tunnel' to be used as a background effect. This is really simple to create. First save your current work - you will need it later!
Start a new scene (CTRL-X) and delete the default plane. Switch to front view (NUM 1). Add a 20-vertex circle about 10 units under the z=0 line (the pink line in your screen) (Figure 23).
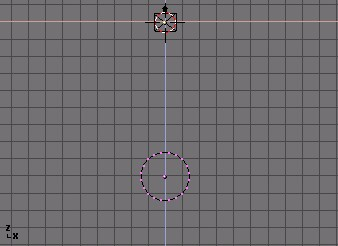
While still in editmode, switch to side view (NUM 3) and snap the cursor to the origin by locating it roughly at the x,y,z=0 point and pressing SHIFT-S. Select Curs>>Grid.
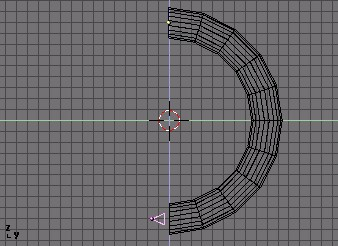
We want to turn the circle into a circular tube, or torus. For this, we will use the Spin function. Go to the Edit Buttons window (F9) and enter a value of 180 in the Degr NumButton and enter '10' in the Steps one. Pressing Spin will now rotate the selected vertices around the cursor at 180 degrees and in 10 steps. (Figure 24).

Leave editmode (TAB). With the default settings, Blender will always rotate and scale around the object's center which is displayed as a tiny dot. This dot is yellow when the object is unselected and pink when it is selected. With the cursor still in the origin, press the Center Cursor button in the Edit Buttons window to move the object center to the current cursor location. Now press RKEY and rotate the tube 180 degrees around the cursor.
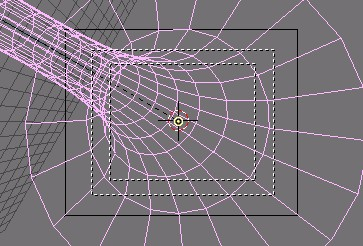
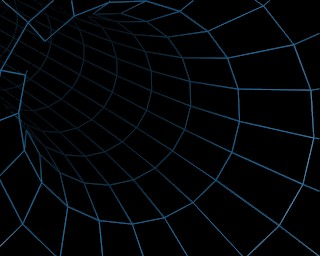
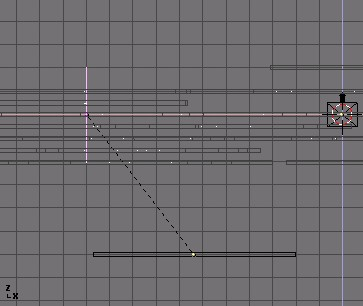
Now it's time to move the camera into the tunnel. Open another 3D window and switch it to the camera view (NUMPAD+0). Position the camera in the side view window to match Figure 25, the camera view should now match Figure 26.
| Missing edges |
|---|---|
If not all of the edges of the tunnel are showing, you can force Blender to draw them by selecting 'All Edges' in the Edit Buttons window (F9). |
To save ourselves some trouble, I want to render this as a looping animation. I can then add as many copies of it as I like to the final video compilation.
There are two things to keep in mind when creating looping animations. First, make sure that there is no 'jump' in your animation when it loops. For this, you have to be careful when creating the keyframes and when setting the animation length. Create two keyframes: one with the current rotation of the tube on frame 1, and one with a rotation of 90 degrees (hold down CTRL while rotating) on frame 51. In your animation frame 51 is now the same as frame1, so when rendering you will need to leave out frame 51 and render from 1 to 50.
Please note that the number 90 degrees is not chosen carelessly, but because the tunnel is periodic with period 18�, hence you must rotate it by a multiple of 18�, and 90� is it, to guarantee that frame 51 is exactly the same than frame 1.
Second, to get a linear motion you need to remove the ease-in and ease-out of the rotation. These can be seen in the IPO window of the tube after inserting the rotation keyframes. The IPO smoothly starts and end, much like a cosine function. We want it to be straight. To do so select the rotation curve, enter editmode (TAB) and select all vertices (AKEY) and press VKEY ('Vector') to change the curve into a linear one (Figure 27).
To create a more dramatic effect, select the camera while in camera view mode (Figure 28). The camera itself is displayed as the solid square. Press RKEY and rotate it a bit. If you now play back your animation it should loop seamlessly.
For the final touch, add a blue wireframe material to the tube and add a small lamp on the location of the camera. By tweaking the lamp's 'Dist' value (attenuation distance) you can make the end of the tube disappear in the dark without having to work with mist. (Figure 29).
When you are satisfied with the result, render your animation and save it as 'tunnel.avi'.
Second sequence: Using the tunnel as a backdrop
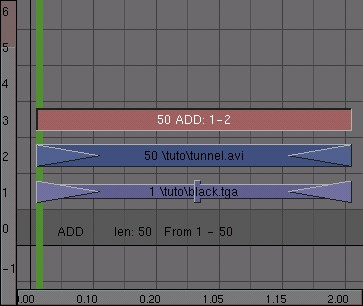
Reload your video compilation Blender file. The tunnel that we made in the last step will be used as a backdrop for the entire animation. To make it more interesting I will modify an ADD effect to change the tunnel into a pulsating backdrop. Prepare a completely black picture and call it 'black.tga' (try pressing F12 in an empty Blender file. Save with F3, but make sure that you have selected the TGA file format in the Render Buttons window). Add both black.tga and the tunnel animation and combine them with an ADD effect (Figure 30).
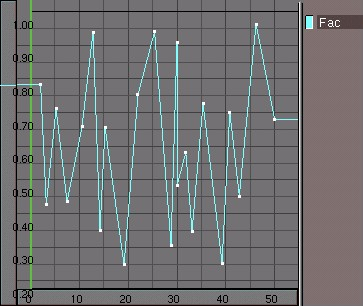
Now with the ADD effect selected, open an IPO window and select the Sequence Editor button in its header. From frame 1-50, draw an irregular line by holding down CTRL and left-clicking. Make sure that the values are between 0 and 1 (Figure 31).
When you are ready, take a look at the result in a preview screen and change the animation into a meta strip.
Save your work!
Fourth Animation: a jumping logo
Let's create some morerandomness and chaos! Take a logo (We can just add a text object) and make it jump through the screen. Again, the easiest way to do this is to add vertices directly into the IPO window (select a LocX, LocY or LocZ channel first), but this time you may need to be a bit more careful with the minimum and maximum values for each channel. Don't worry about the looks of this one too much - the next step will make is hardly recognizable anyway. (Figure 32).
Save the animation as 'jumpylogo.avi'.
Fifth Animation: particle bars
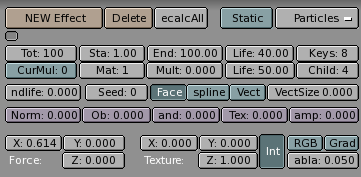
Our last effect will use an animated mask. By combining this with the logo of the previous step, I will achieve a streaking effect that introduces the logo to our animation. This mask is made by using a particle system. To set one up switch to side view, add a plane to your scene and while it is still selected switch to the Animation Buttons window (F7). Select 'New effect' and then change the default effect (build) to 'Particles'. Change the system's settings as indicated in Figure 33.
Press TAB to enter editmode, select all vertices and subdivide the plane twice by pressing WKEY and selecting Subdivide from the pop-up menu.
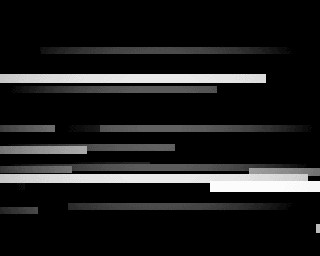
Next switch to front view and add another plane. Scale it along the X-axis to turn it into a rectangle (press SKEY and move your mouse horizontally. Then click MMB to scale along the indicated axis only). Give the rectangle a white material with an emit value of one.
Now you need to change the particles into rectangles by using the dupliverts function. Select rectangle, then particle emitter and parent them. Select only the plane and in the left part of the animation buttons window, select the DupliVerts button.� Each particle is now replaced by a rectangle (Figure 34).
I now add some mist as a quick hack to give the rectangles each a
different shade of gray. Go to the World Buttons window with
FKEY , click on the
 button in its header and select
Add New. The world settings will now appear.
button in its header and select
Add New. The world settings will now appear.
By default, the sky will now be rendered as a gradient between blue and black. Change the horizon colors (HoR, HoG, HoB) to pure black (Figure 35).
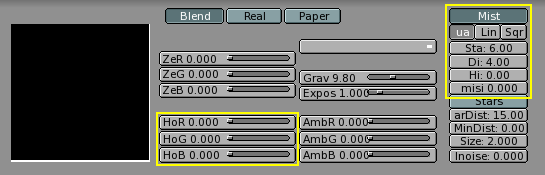
To activate rendering of mist activate the Mist button in the middle of the screen. When using mist, you have to indicate on which distance from the camera it works. Select the camera, switch to the Edit Buttons window and enable ShowLimits. Now switch to top view and return to the World Buttons window. Tweak the Sta: and Di: (Start, Distance, respectively) parameters so that the mist covers the complete width of the particle stream (Figure 35 and Figure 36).
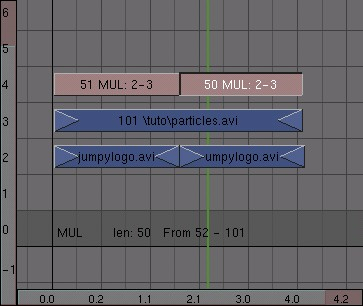
Set the animation length to 100 frames and render the animation to disk. Call the file 'particles.avi' (Figure 37).
Third sequence: Combining the logo and the particle bars
By now you know the drill: reload your compilation project file, switch to the Sequence Editor window and add both 'particles.avi' and 'logo.avi' to your project. Combine them together with a MUL effect. Since the logo animation is 50 frames and the particles animation is 100 frames, you'll need to duplicate the logo animation once and apply a second MUL effect to it (Figure 38 and Figure 38).
Combine these three strips into one meta strip. If you're feeling brave you can make a few copies and give them a small time offset just like with the wireframe cube.

Sixth Animation: zooming logo
If you would combine all your animations so far you would get a really wild video compilation, but if this was your company's presentation you would want to present the logo in a more recognizable way. The final part of our compilation will therefore be an animation of the logo that zooms in very slowly. Prepare this one and save it as 'zoomlogo.avi'. Also prepare a white picture and save it as 'white.tga'.
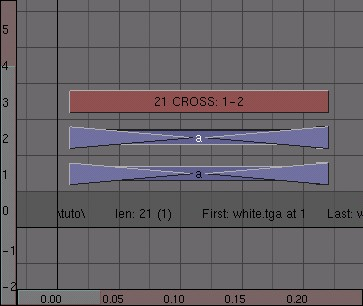
We will now use the CROSS effect to first make a rapid transition from black to white, then from white to our logo animation. Finally, a transition to black will conclude the compilation.
Start off by placing black.tga in channel 1 and white.tga in channel 2. Make them both 20 frames long. Select them both and apply a cross effect. The cross will gradually change the resulting image from layer 1 to layer 2. In this case, the result will be a transition from black to white (Figure 40).
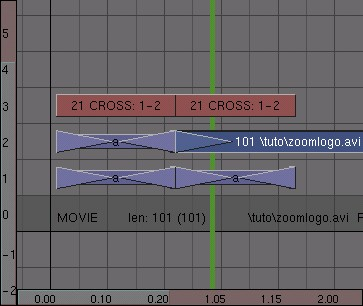
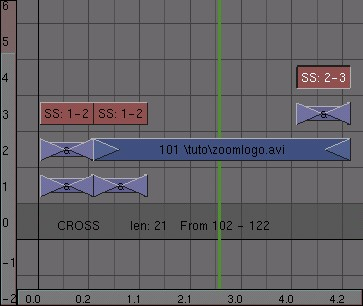
Next, add a duplicate of white.tga to layer 1 and place it directly to the right of black.tga. Make it about half as long as the original. Place the logo zoom animation in layer 2 and add a cross effect between the two. At this point, the animation looks like a white flash followed by the logo zoom animation (Figure 41).
The last thing that you need to do is to make sure that the animation will have a nice transition to black at the very end. Add a duplicate of black.tga and apply another cross effect. When you are ready, transform everything into a meta strip (Figure 42).
Assembling everything so far
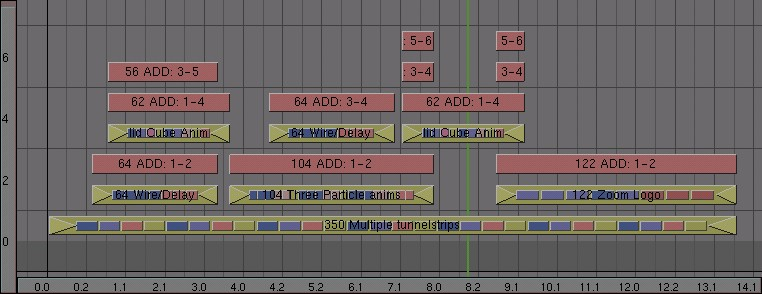
We're at the end of our work! It's time add some of the compilations that we have made so far and see how our work looks. The most important thing to remember while creating your final compilation is that when rendering your animation, the sequence editor only 'sees' the top layer of video. This means that you have to make sure that it is either a strip that is ready to be used, or it should be an effect like ADD that combines several underlying strips.
The foundation of the compilation will be the fluctuating tunnel. Add a some duplicates of the tunnel meta strip and place them in channel one. Combine them into one meta strip. Do not worry about the exact length of the animation yet; you can always duplicate more tunnel strips.
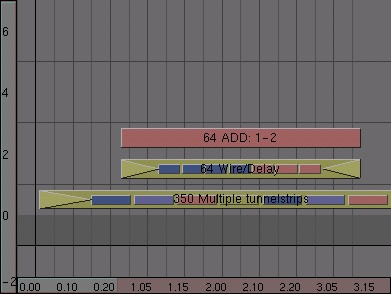
On top of that, place the delayed wireframe cube in channel 2. Add channel 1 to channel two and place the add effect in channel 3 (Figure 43).
Now we also want to add the solid cube animation. Place it in channel 4, overlapping with the wireframe animation in channel 2. Add it to the tunnel animation in layer one. This is where things are starting to get a little tricky; if you would leave it like this, the animation in channel 5 (the solid cube together with the tube) would override the animation in channel 2 (the wireframe cube) and the wireframe cube would become invisible as soon as the solid cube shows up. To solve this, add channel 3 to channel 5 (Figure 44).
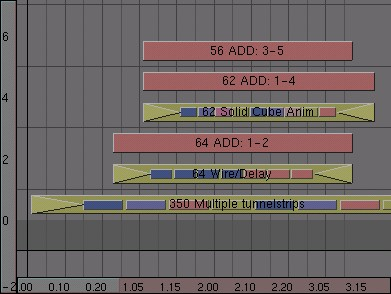
You will often need to apply some extra add operations to fix missing parts of video. This will most likely become apparent after you have rendered the final sequence.
Slide the Sequence Editor window a bit to the left and add the meta strip with the particle/logo animation in it. Place this strip in layer 2 and place an add effect in layer 3. For some variation, duplicate the wireframe animation and combine it with the add in layer 3 (Figure 45).
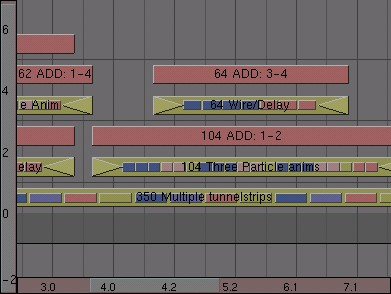
Now go to the end of the tunnel animation strip. There should be enough place to put the logo zoom animation at the end and still have some space left before it (Figure 46). If not, select the tunnel strip, press TAB and add a duplicate of the animation to the end. Press TAB again to leave meta edit mode.
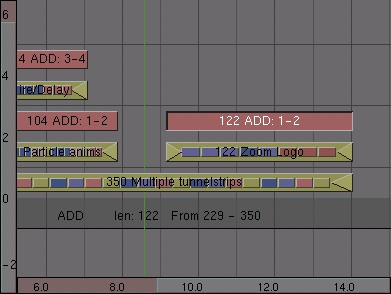
If there is still some space left, wecan add a copy of the solid cube animation. To get it to display correctly, you will have to apply two add channels to it: one to combine it with the particle logo animation and one to combine it with the logo zoom animation (Figure 47).

Figure 48 shows the complete sequence.
Conclusion
We are now ready to render our final video composition! To tell Blender to use the Sequence Editor information while rendering, select the 'Do Sequence' button in the Render Buttons window. After that, rendering and saving your animation works like before (be sure not to overwrite any of your AVI of the sequence!).