Rendering
Rendering is the final process of CG (short of postprocessing, of course) and is the phase in which the image corresponding to your 3D scene is finally created.
The rendering buttons window is accessed via F10 or the
 button. The rendering buttons are shown in Figure 1.

The rendering of the current scene is performed by pressing the big central RENDER button, or by pressing F12. The result of the rendering is kept in a buffer and shown in its own window. It can be saved by pressing F3 or via the File>>Save Image menu.
The image is rendered according to the dimensions defined in the top of the central-right block of buttons (Figure 2).
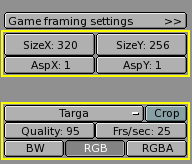
By default the dimensions are 320x256 and can be changed as for any NumButton. The two buttons below define the aspect ratio of the pixels. This is the ratio between the X and Y dimensions of the pixel of the image. By default it is 1:1 since computer screen pixels are square, but can be varied if television shorts are being made since TV pixels are not square. To make life easier the rightmost block of buttons (Figure 3) provides some common presets:
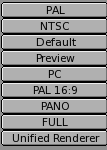
PAL 720x576 pixels at 54:51 aspect ratio.
NTSC 720x480 pixels at 10:11 aspect ratio.
Default Same as PAL, but with full TV options, as explained in the following sections.
Preview 640x512 at 1:1 aspect ratio. This setting automatically scales down the image by 50%, to effectively produce a 320x256 image.
PC 640x480 at 1:1 aspect ratio.
PAL 16:9 720x576 at 64:45 aspect ratio, for 16:9 widescreen TV renderings.
PANO Standard panoramic settings 576x176 at 115:100 aspect ratio. More about 'panoramic' renderings in the pertinent section.
FULL 1280x1024 at 1:1 aspect ratio.
Rendering by Parts
It is possible to render an image in pieces, one after the other, rather than all at one time. This can be useful for very complex scenes, where rendering small sections one after the other only requires computation of a small part of the scene, which uses less memory.
By setting values different from 1 in the Xpart and Ypart in the left column of the central buttons (Figure 4) you force Blender to divide your image into a grid of Xpart x Ypart sub-images which are then rendered one after the other and finally assembled together.
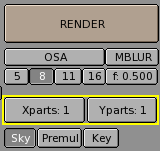
Blender cannot handle more than 64 parts.