How to setup a walkcycle using NLA
by Malefico
In this tutorial we will try to set up a walkcycle and use it with the PATH option in the Blender NLA Editor. Before starting let me tell you that you will need to have a basic knowledge of the animation tools, (armature set up), in order to follow the text, and have a lot of patience. It is highly recommendable to have read all the precedent NLA related part of the documentation.
We are going to use a character set up like the one explained in "Hand and Foot tutorial", that is with feet bone split up from the leg and using an extra null bone to store the IK solver constraint. For further details please check that chapter !
Before getting any deeper we'll need a character, an armature and a couple of actions for it. If you don't know where to find them just download this blend. Remember: never go out for tutoring without a blend at hand ;-)
When you open the scene you'll find four windows: a 3D window with a character (criticism are not allowed), an action window, and IPO window and finally a NLA window. If you select the armature and check the action window, you'll see three actions defined: "WALKCYCLE", "WAVE_HAND" and "STAND_STILL". In WALKCYCLE and STAND_TILL there are keyframes for almost all control bones while in "WAVE_HAND" there are keyframes only for the arm and hand. This will allow our character to simultaneously wave its hand while walking.
The main idea behind this is to work on each single movement and later on combining everything in the NLA window.
"The path to success"
There are two main ways to animate a walkcycle, first one is to make the character actually advance through the poses of the cycle and the second one is to make the character walk "in situ" thus without real displacement.
The later option though is more difficult to set up, is the best choice for digital animation and it is our choice for this tutorial.
The whole walkcycle will be an "action" for our armature, so let's go an create a new action and switch to "pose mode" to get something like Pose 1 (the so called "contact pose"in Figure 57.
 | There are some details to bear in mind at the time of setting up an armature for walkcycle. As some of you might know, Blender uses a name convention for bones. If we attend to this convention the "Paste Flip Pose" button will be available to paste the "mirror" pose of our model anytime. See this chapter for more information. Also, before parenting your armature to your model, be sure their local axis are aligned to the global axis by selecting them and pressing CTRL-SHIFT-A |
To animate our walking model we will restrict us to animate a few control bones. In the case of the legs we are going to animate its feet since the IKA solvers will adjust the leg bones better than us. To ensure that feet will move in fixed distances, please activate the Grab Grid option before start moving bones, reduce the grid size if needed.
A nice method is to hide all the bones we are not going to set keyframes for. This way is easier to see the model during animation and keeps our task simple.
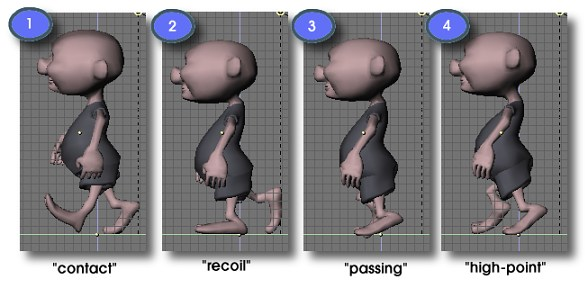
Normally a walkcycle involves four poses, which are commonly known as "contact", "recoil", "passing", and "high-point". Take a look at Figure 57.
Most important pose is "Contact pose". Most animators agree every walkcycle should start by setting up this pose right. Here the character cover the wider distance it's capable to do in one step. In "Recoil pose", the character is in its lower position, with all its weight over one leg. In "High-point pose", the character is in its higher position, almost falling forwards. "Passing pose" is more like an automatic pose in-between recoil and high-point.
The work routine is as follows:
Pose the model in contact pose in frame 1
Insert keyframes for the control bones of your armature (those you use for grabbing, mainly IK solvers).
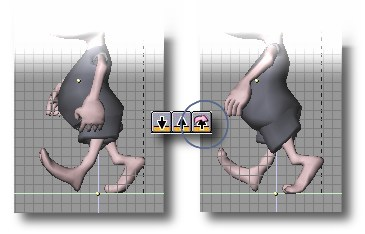
Without deselecting them press the "Copy Pose" button. Now the bone's location and rotations have been stored in memory.
Go a few frames forward and press "Paste Flip Pose". The flip pose will be pasted in this frame, so if in the previous frame the left leg was forwards now it will be backwards, and viceversa.
Now once again select your control bones and insert keyframes for them.
Go a few frames forward again (it is recommendable that you use the same number of frames than before, an easy choice is to go just 10 frames every ahead time) and press "Paste Pose", this will paste the initial pose ending the cycle. This way we have achieved a "Michael Jackson" style walkcycle since our character never lift its feet up from the ground.
To fix it, go to some intermediate position between the first two poses and move the feet to get something like the Recoil Pose in Figure 57, where the waist reaches its lower position.
Insert keyframes and copy the pose.
Now go to a frame between the last two poses (inverse contact and contact) and insert the flip pose . Insert the required keyframes and we are done.
 | If at the contrary you see that the mesh is weirdly deformed, don't panic !, go Edit Mode for the armature, select all bones and press CTRL+N. This will recalculate the direction of bones rolls which is what makes the twisting effect. |
You should follow the same routine for all the poses you want to include in your walkcycle. I normally use the contact, recoil , and a high point poses and let Blender to make the passing pose.
Now if you do ALT-A you will see our character walking almost naturally.
It will be very useful to count how many Blender Units (B.U.) are covered with each step, which can be done counting the grid squares between both feet in Pose 1. This number is the STRIDE parameter that we are going to use later on in the NLA window.
Now we will focus on make the character actually advance through the scene.
First of all deselect the walkcycle action for our armature so it stops moving when pressing ALT-A. To do this, press the little X button besides the action name in the action window.
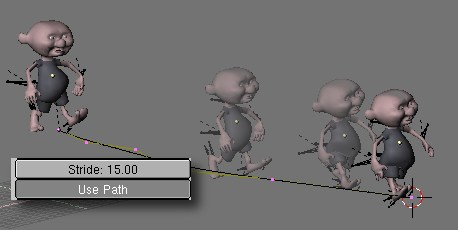
Then we will create a PATH object for our hero in the ground plane, trying not to make it too curve for now (the more straight the better), once done let's parent the character to the path (and not the other way round). If everything went OK, we will see our character moving stiff along the path when pressing ALT+A.
Now go to the NLA window and add the walkcycle action in a channel as a NLA strip. With the strip selected press N and then push the Use Pathbutton.
 | It is convenient that at the moment of adding actions in the NLA window, that no action is selected for the current armature. Why ? Because instead of a NLA strip, we'll see the individual keyframes of the action being inserted in the armature channel and this keyframes will override any prior animation strips we could have added so far. Anyway, if you do insert an action in this way, you can always convert the keyframes into a NLA strip by pressing the CKEY. |
Now if you start the animation again some funny things might happen. This is due to we haven't set the STRIDE parameter.
This value is the number of Blender Units that should be covered by a single walkcycle and is very important that we estimate it with accuracy. Once calculated we should enter it in the STRIDE box.
If we adjust it well and if the walkcycle was correctly set up, our character should not "slide" across the path.
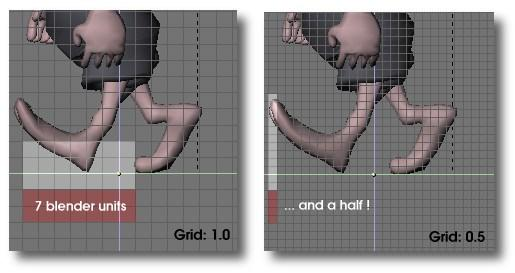
One way to estimate the Stride value accurately is to count how many grid squares there are between the toes of the feet in Pose 1. This value multiplied by 2 and by the grid scale (normally 1 grid square = 1 B.U. but this could not be the case, for instance in the example 2 grid squares = 1 B.U.) will render the searched STRIDE value.
In the example there are 7.5 squares with GRID=1.0, since the Grid scale is 1.0 we have: STRIDE = 7.5 x 1.0 x 2 = 15
It's likely that we want our character to walk faster or slower or even stop for a while. We can do all this by editing the path's Speed curve.
Select the path and open an IPO window. There we will see a Speed curve normalized between 0 and 1 in ordinates (Y axis) and going from frame 1 to the last in the X axis. The Y coordinate represents the relative position in the path and the curve's slope is the speed of the parented objects. In Edit Mode we will add two points with the same Y coordinate. This "table" represents a pause in the movement and it goes from fram 40 to frame 60 in the figure.
The problem here is that when our character stops because of the pause in the curve, we will see him in a "frozen" pose with a foot on the ground and the other in the air.
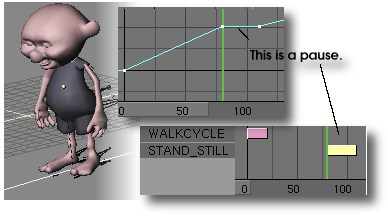
To fix this little problem we will use the NLA window. What we have to do is to insert the "STAND_STILL" action, this is a pose where our character is at rest. I have defined this action as only one frame by erasing all displacements and rotations of the bones. (See Clearing Transformations), and then moving a couple of bones to get a "resting" attitude.
Since the pause is from frame=78 to frame=112 we should insert this "still" action exactly there for it to perfectly fit the pause. For the animation doesn't start nor end briskly we can use the BlendIn and BlendOut options, where we can set the number of frames used to blend actions and in this way doing a more natural transition between them. In this way the character will smoothly change its pose and everything will look fine. If we do use a BlendIn or BlendOut then we should start the action BlendIn frames earlier and finish it BlendOut frames later, because the character should be still moving while changing poses.
We can of course combine different walkcycles in the same path as for instance change from walking to running in the higher speed zone.
In all these situations we will have to bear in mind that the different efects will be added from one NLA strip to the precedent strips and only them. So, the best option is to insert the walkcycle and still strips before any other.
Moving hands while walking
To add actions in the NLA window we have to locate the mouse pointer over the armature's channel and press SHIFT-A. A menu with all available actions will pop up. If we don't locate the pointer over an armature channel an error message ERROR: Not an armature" will pop up instead.
So, place the pointer over the armature strip and press SHIFT-A and add the "WAVE_HAND" action.
As this particular action is just the waving of the left arm to say "hello" during some point in the walkcycle, we will not use the "Use Path" option but move it in time so it overlaps the arms keyframes from the walkcycle action. Move the pointer over the strip and press NKEY or just drag it and scale it to your satisfaction.
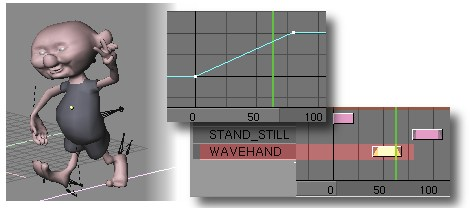
Since this action is the last to be calculated (remember Blender evaluates actions from Top to Bottom in the NLA Editor), it will override any keyframes defined for the bones involved in the precedent actions.
Well, there is no much left to say about NLA and armatures. Now it is time for you to experiment and to show the results of your work to the world. One last recommendation though: it is possible to edit keyframes in the NLA window. We can duplicate frames (SHIFT-D), grab keyframes (GKEY) and also erase keyframes (XKEY), but if you do erase keyframes be careful because they will be lost forever from the currently selected action. So be careful and always convert to NLA strip before erasing anything.
Bye and good luck blenderheads !!