The RenderingButtons

This button field contains all the settings and commands that involve displaying and rendering. All of these data are part of the Scene block. They must thus be set separately for each Scene within a Blender file. Hotkey: F10.

In the header of the ButtonsWindow you get a SceneBrowse for that reason.

Pics
Enter the name of the directory to which the rendered image must be written if the "ANIM" command is given and, when required, the first few letters of the file name. Blender automatically assigns files a number, frame 1 becoming 0001. In this example, pictures are written as the files /render/0001, /render/0002 etc. If you enter "/render/rt" in the button, the files will be called /render/rt0001, /render/rt0002... Blender creates the specified directories itself if they do not already exist. The small square button to the left of the TextBut is used to invoke a FileSelect. Use it to select the output directory, and possibly a file name, and press ENTER to assign this to the TextBut .
Backbuf
Enter a name of a image file to be used as a background. Blender uses the rendered alpha to determine the extent to which this background is visible. A code can be processed into the file name, which allows an already rendered animation to be used as a background. Be sure that a '#' is placed at the end. This is replaced by the current (four-digit) frame number. For example: /render/work/rt.# becomes /render/work/rt.0101 at frame 101. The two small buttons to the left of the TextBut invoke an ImageSelect or a FileSelect Window. Specify the file and press ENTER to assign it to the TextBut.
Ftype
Use an "Ftype" file, to indicate that this file serves as an example for the type of graphics format in which Blender must save images. This method allows you to process 'color map' formats. The colormap data are read from the file and used to convert the available 24 or 32 bit graphics. If the option "RGBA" is specified, standard colour number '0' is used as the transparent colour. Blender reads and writes (Amiga) IFF, Targa, (SGI) Iris and CDi RLE colormap formats. Here, as well, the two small button to the left of the TextBut can be used to invoke an ImageSelect or a FileSelect window.

Extensions
Filename extensions (*.xxx) will be added to the filename, needed mostly for Windows systems.

Each Scene can use another Scene as a "Set". This specifies that the two Scenes must be integrated when rendered. The current Lamps then have an effect on both Scenes. The render settings of the Set, such as the Camera, the layers and the World used, are replaced by those of the current Scene. Objects that are linked to both Scenes are only rendered once. A Set is displayed with light gray lines in the 3DWindow. Objects from a Set cannot be selected here.
Window Location
These nine buttons visualise the standard position in which the Render Window appears on the screen. The setting in the example specifies that the Window must be at the top in the middle.
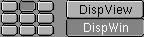
DispView
The rendering can also be displayed in the 3Dwindow instead of in a separate window. This occurs, independent of the resolution, precisely within the render borders of Camera view. Use F11 to remove or recall this image.
DispWin
The rendering occurs in a separate window. Use F11 to move this window to the foreground or background.

Edge
In a post-render process an outline will be added to the objects in the rendering. Together with special prepared materials, this causes a cartoon-like picture.
Eint:
Sets the intensity for the edge-rendering. Too high values causes outlining of single polygones.
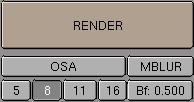
RENDER
Start the rendering. This is a 'blocking' process. A square mouse cursor indicates that Blender is busy. Hotkey: F12. Rendering can also take place in the 'background'. Use the command line for this:
blender -b file.blend -f 100
|
This will render frame 100 and save the images to disk.
OSA
OverSampling. This option turns anti-aliasing on, to achieve 'soft' edges and perfectly displayed Image textures. OSA rendering generally takes 1.5 to 2 times longer than normal rendering.
5, 8, 11, 16
Blender uses a Delta Accumulation rendering system with jitteredsampling. These numbers are pre-sets that specify the number of samples; a higher value produces better edges, but slows down the rendering.
MBLUR
This option mimics a natural (or long) shutter time by accumulating multiple frames.
The number-button "Bf:" defines the length of the shutter time.
The value of "Osa" (5,8,11,16) defines the number of accumulated images.
Setting the "OSA" option makes each acumulated image having antialising.
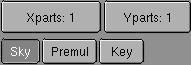
Xparts, Yparts
OSA rendering of large images, in particular, can take up a lot of memory. In addition to all the shadow buffers and texture maps and the faces themselves, this takes up 10 to 16 bytes per pixel. For a 2048x1024 picture, this requires a minimum of 32 Mb free memory. Use this option to subdivide the rendering into 'parts'. Each part is rendered independently and then the parts are combined. The "Xparts" are particularly important when rendering "Ztransp" faces.
Sky
If a World has 'sky', this is filled in in the background. The alpha is not altered, but the transparent colours 'contaminate' the background colours, which makes the image less suitable for post-processing.
Premul
'Sky' is never filled in. The alpha in the picture is delivered as "Premul": a white pixel with alpha value 0.5 becomes: (RGBA bytes) 128, 128, 128, 128. The colour values are thus multiplied by the alpha value in advance. Use "Premul" alpha for post-processing such as filtering or scaling. Remember to select the "RGBA" option before saving. When Blender reads RGBA files, "Premul" is considered the standard.
Key
'Sky' is never filled in. The alpha and colour values remain unchanged. A white pixel with an alpha value of 0.5 becomes: (RGBA bytes) 255, 255, 255, 128. What this means is especially clear when rendering Halos: the complete transparency information is in the (hidden) alpha layer. Many drawing programs work better with "Key" alpha.
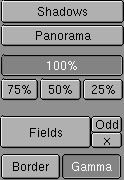
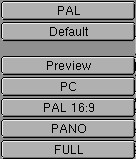
Panorama
Blender can render panoramas. To do this, a number of pictures are rendered, where the number in question corresponds with the value of "Xparts". For each 'part', the Camera is rotated in such a way that a continuous panorama is created. For the width of the panorama of the Camera Lens, adjust the "Xparts" and the "SizeX" for the picture. The total width of the picture, in pixels becomes: Xparts * SizeX. These are the settings for a 360 degree panorama: Xparts = 8, SizeX = 720, lens = 38.6.
100%, 75%, 50%, 25%
These pre-sets allow you to render smaller pictures. It also affects the size of 'shadow buffers'.
Fields
Specifies that two separate fields are rendered. Each field is a complete picture. The two fields are merged together in such a way that a 'video frame' is created.
Odd
This option indicates that the first field in a video frame begins on the first line. x (TogBut) With "Field" rendering, this switches the time difference between the two fields off (0.5 frame).
Border
This allows you to render a small cut-out of the image. Specify a render 'border' with SHIFT+B in the 3DWindow (in Camera view of course). A cut-out is always inserted in a complete picture, including any "BackBuf" that may be present. Set the option "Crop" ON to turn this off.
Gamma
Colours cannot be normally added together without consequences, for example when rendering anti-aliasing. This limitation is caused by the way light is displayed by the screen: the colour value 0.4 does not appear half as strong as 0.8 (in actuality it is nearly 0.56!). This can be solved by assigning the display-hardware an extremely high gamma correction: gamma 2.3 or even higher. This gives a really pale image with 'washed out' dark tints to which dithering must be applied. Blender renders everything internally already gamma-corrected. This produces a more stable anti-aliasing for the eye, i.e. anti-aliasing that does not 'swim'. To see this difference, render a "Shadeless" white plane with OSA - and with and without "Gamma". The only time this option should be set to OFF is when Blender is used for imagecomposition.
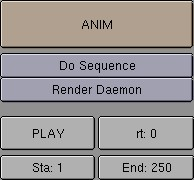
ANIM
Start rendering a sequence. This is a 'blocking' process. A square mouse cursor indicates that Blender is busy. Animations can also be rendered in the 'background'. Use the command line for this: blender -b file.blend -a.
Do Sequence
Specifies that the current Sequence strips must be rendered. To prevent memory problems, the pictures of the complete Sequence system are released per rendering, except for the current frame.
RenderDeamon
Indicates to the external network render utility that the current Scene must be rendered.
Play
This starts an animation playback window. All files from the "Pics" directory are read and played.
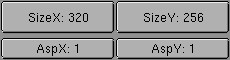
SizeX, SizeY
The size of the rendering in pixels. The actual value is also determined by the percentage buttons (100%, 75%, etc.).
AspX, AspY
The pixel relationship. The pixels in monitors and video cards are not usually exactly square. These numbers can be used to specify the relative dimension of a pixel.
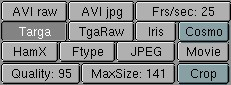
These buttons specify the graphics file format in which images are saved.
JPEG
This lossy format can produce strong compression. Use "Quality" to indicate how much compression you want.
HamX
A self-developed 8 bits RLE format. Creates extremely compact files that can be displayed quickly. To be used only for the "Play" option.
MaxSize
For Movies: the average maximum size of each Movie frame in Kbytes. The compression factor can then vary per frame.
Crop
Specifies that the "Border" rendering must not be inserted in the total image. For Sequences, this switches the automatic picture scaling off. If the pictures are enlarged, the outside edges are cut off.

BW
After rendering, the picture is converted to black & white. If possible, the results are saved in an 8 bit file.