 |
|||||||||||||
| News | Tutorials | Games | Downloads | Links | Contact | ||||||||
 |
 |
|
 |
||||||||||||||
Featured Author: -Dim- |
Tutorials - The GIMP
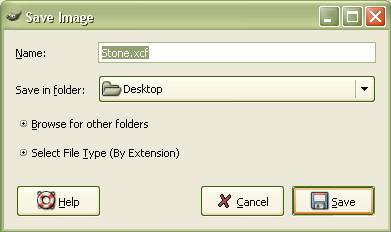
Making a Stone Textureby DIMPreamble: The way many beginners texture things when making a game, is to pull pictures off the internet, or take other people’s textures and use them in their own projects. This method has several disadvantages. First, and probably most important, is that when you take textures from other sources, they are NEVER exactly what you need for your given situation. Second, that texture you are taking is almost certainly of someone else’s labor, and they hold the intellectual property rights. And thirdly, it defeats the purpose of making a game by yourself. If you have any interest in becoming professional, knowing how to make your own textures is 100% necessary. The purpose of this tutorial is mainly to teach people many of the basic concepts used with 2D image editors. We’ll be using the GIMP as our editor for this tutorial. It is available here: http://www.gimp.org/. A couple of notes: Before we begin, if you have never used the GIMP before, load it up now and experiment for awhile. I’m not going to cover the functions of each button, so figure out what things do on your own for a bit. Also, if you have Adobe Photoshop, you can use that in place of the GIMP, just keep in mind that the short cut keys and many of the locations of buttons will be different. Beginning: First thing we’ll do is create a new image (ctrl+N). Make both it’s height and width 512 pixels, and press OK. When making textures for a game, always use a power of two for their dimensions. i.e. 4, 16, 32, 64, 128, 256, 512, 1024, etc. Often it’s preferable to create a texture at 512 pixels (which is a fairly large image for many game engines), and then, when finished, reduce it to 256, or better yet 128 pixels. In general, when ever you have a texture that is 512 pixels wide or tall, if it is reduce to 256, there will be nearly no noticeable difference. Right now, you should have a blank white canvas titled “Untitled”. Lets save now and save often. Select File>Save (ctrl+S) and enter the following:
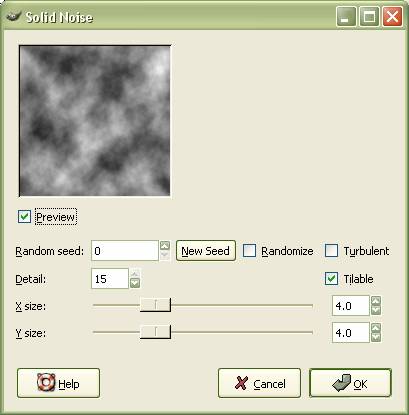
We’ll save it to the desktop for ease of access. Make sure to save it as .xcf. This is the GIMP's native file format, so it’ll preserve all your layers, channels and alpha. Our final image will be saved differently. Now go to Filters>Render>Clouds>Solid Noise. Feel free to play around with the functions, but for your final choice, enter the following:
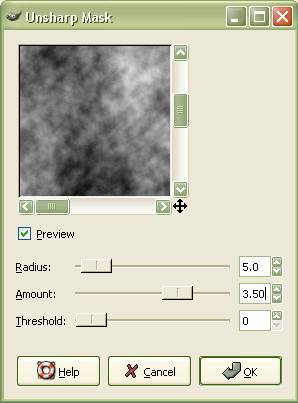
Your image should now look like the preview window above. That effect made it look pretty good, but not nearly stone-like. To add a 3-dimensional quality to it, we’ll run it through a couple more filters. First, go to Filters>Enhance>Unsharp Mask. Feel free to play around with the functions, but for your final choice, enter the following:
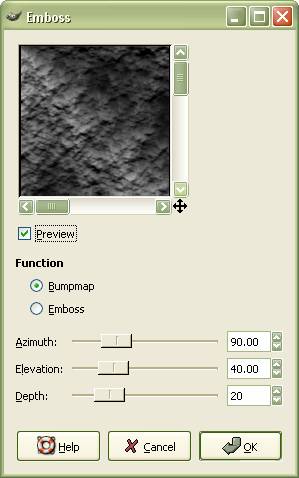
This should have added some contrast, and also brought out some detail. Now, to add a 3D quality to it, we’ll get to Filters>Distorts>Emboss. Feel free to play around with the functions, but for your final choice, enter the following:
So far, your texture should look like this:
One more thing before we add color. Filters>Map>Make Seamless. Since this texture isn’t specific to a certain object, meaning it could be used for any rock, we’ll want to make it tileable. Color: 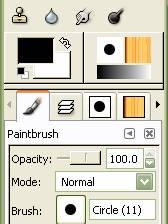 To add color, first we will create a new layer. Layers are basically
another image on top of your fist image, but they’re both in the same file. The reasons why
this is good, is that you can combine layers, keep selections separate, have a separate work
space so you don’t damage your original image, and many other things. To do this, go to
Layer>New Layer. To keep track of our layers, go to Dialogues>Layers (ctrl+L). Name it Color
Base. It is advantageous to name your layers with good descriptions of their functions.
Another way to add a dialogue is to click the small arrow under your tools. This’ll open a
drop down menu. Select Add Tab>Layers. I generally have quite a few dialogue tabs open
(see image...).
To add color, first we will create a new layer. Layers are basically
another image on top of your fist image, but they’re both in the same file. The reasons why
this is good, is that you can combine layers, keep selections separate, have a separate work
space so you don’t damage your original image, and many other things. To do this, go to
Layer>New Layer. To keep track of our layers, go to Dialogues>Layers (ctrl+L). Name it Color
Base. It is advantageous to name your layers with good descriptions of their functions.
Another way to add a dialogue is to click the small arrow under your tools. This’ll open a
drop down menu. Select Add Tab>Layers. I generally have quite a few dialogue tabs open
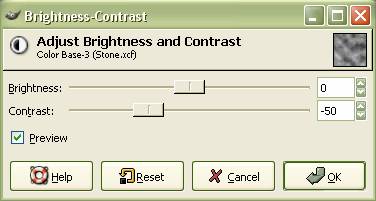
(see image...).Select your new layer in the layer dialogue, then go to Filters>Render>Clouds>Solid Noise. Keep all the values the same as last time, but make your detail 2, rather than 15, and click “New Seed” a few times to get a pattern you like. This new rendering should obscure your fist one, making it invisible. But don’t worry, the other one still exists on your original layer, unchanged. Before we add color to this layer, go to your layer dialogue and click on the drop-down menu that says “Normal”. Instead, select “Overlay”. Go ahead and play around with all the different layer modes. Because there is no color in your image, you won’t notice a difference on some selections. Now that it is set to overlay, go to Layers>Colors>Brightness/Contrast, and enter this:
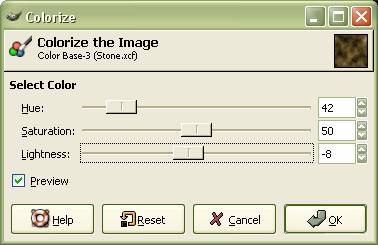
Next, select the Color Base layer and go to Layer>Colors>Colorize. Feel free to play around with the functions, but for your final choice, enter the following:
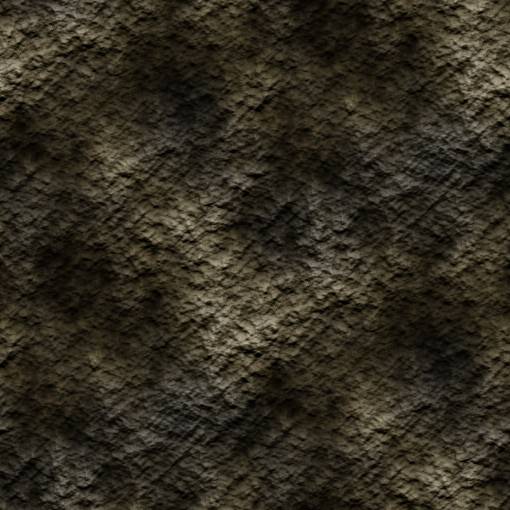
Now, we’ll do what we did last time to make it seamless, with the Color Base layer selected (Filters>Map>Make Seamless). So far your image should look something like this:
From here, use what I’ve taught to add more layers of color and detail. Remember to use brightness and contrast to your advantage. One reason we left the base layer black and white, was that you can adjust the contrast on that, and have just the black and white become closer or farther from grey. If you use color, adjusting the contrast will make it look awkward. Remember to use this technique often when editing. Saving: When you have finished your texture, it’s time to save it in another file format. But first, save it again in the .xcf format (ctrl+S) (it’s important to save the .xcf file before this next step). After it has been saved as a .xcf, scale the image to 256x256, by going to Image>Scale Image. The reason that we originally saved in the .xcf file format, was so that if the GIMP crashed, or you quit it, you could always go back and finish or edit your image. Unlike all other file formats, the .xcf format will preserve all your layer and transparency information. But .xcf is only open able in the GIMP, and nothing else. This isn’t very helpful if you have any need for the image (beyond printing it, which you can do in the GIMP) for anything else. To change that, we will save the completed image in the .png (PNG stands for “Portable Network Graphic”) file format. The reason we use this file format, is that a) it has a very small file size. This is important because it allows you to keep the file size of your projects down, and it’ll reduce the strain of rendering it in real time. b) it preserves the colors perfectly. This is unlike a JPEG, which blends close colors together as a form of compression to keep file size down. c) the .png format contains an alpha channel which allows you to use transparent textures in your project. To save it as a .png, go to File>Save As (shift+ctrl+S), and instead of Stone.xcf, type Stone.png. Say yes to all the following prompts, and you’re all set. -DIM Back to the tutorials index... |
|||||||||||||
|
|
||||||||||||||
|
||||||||||||||
Website design by Tony "blendenzo" DiRienzo. All content © Copyright Tony DiRienzo unless otherwise noted.